PERT, short for Project Evaluation and Review Technique, is a popular project management tool used to represent, schedule and coordinate tasks involved in a project. In a PERT chart, tasks are represented as a network of nodes. The direction of connectors among tasks indicate the sequence of tasks.
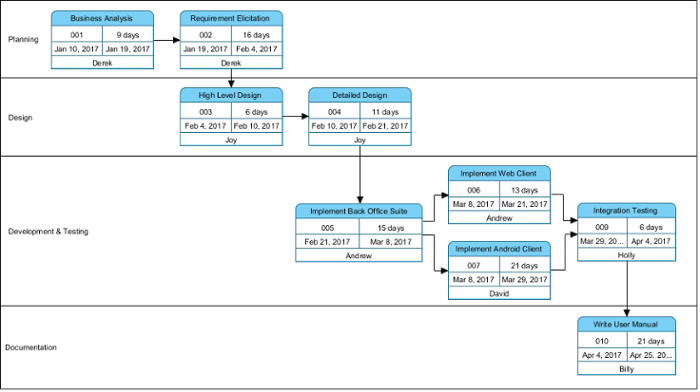
The figure above shows an example of PERT Chart that shows the major, high level development activities in a software project. It consists of three major components:
- Lane: A lane organizes and categorizes tasks into a group associated with a concept such as a phase or a person.
- Task: A piece of work involved in project. Each task consists of a task name, an ID, the start and end date, and the person who are responsible for it.
- Dependency (connector): Shows the sequence of tasks. A task cannot begin until one or more tasks have occurred, begun or completed.
Creating a PERT Chart
- Select Diagram > New from the application toolbar.
- In the New Diagram window, select PERT Chart.
- Click Next.
- Enter the name and description. The Location field enables you to select a model to store the diagram.
- Click OK.
Creating a lane
- Select
 from the diagram toolbar.
 - Click on the diagram area to create it.
- Enter its name.
- Press Enter to confirm the name.
Note: You can re-position a lane by dragging it up and down.
Creating an independent task
To create a task that does not rely on the prior completion of another task:
- Select
 from the diagram toolbar.
 - Click inside the appropriate lane in the PERT Chart to create it.
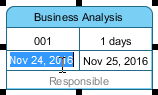
- Enter the task name.
- Press Enter to confirm the name.
- Specify the start and end date by double clicking on the corresponding cell and typing the value. Note that the start date must be earlier than finish date.
Creating the ‘next task’
You can use the Resource Catalog to create a next task of an existing task. To do this:
- Move the mouse pointer over the existing task.
- Press on the resource icon Dependency -> Task and drag it out.
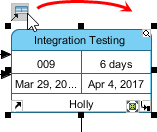
- Release the mouse button at the appropriate lane in the PERT Chart to create the task.
- Enter the task name.
- Press Enter to confirm the name.
- Specify the start and end date by double clicking on the corresponding cell and typing the value. Note that the start date must be earlier than finish date. Besides, the start date must be greater than the end date of those depending tasks.