Use Case 2.0 is a scalable and agile approach that uses use cases to capturing requirements and driving the incremental development of a system to fulfill them. It helps you understand how the system will be used and leading you through the development of an appropriate system to support the users.
In this STEPS Wizard, you will be guided to identify use cases, use case stories and use case slices following the Use Case 2.0 practice.
Objectives
This Use Case 2.0 STEPS Wizard helps you:
- Identify the goals to be achieved as use cases
- Identify the specific ways to achieve these goals as use case stories
- Partition the stories into suitably sized pieces of work, known as use case slices
- Produce a release plan
- Plan out development tasks to be conducted in implementing the use cases
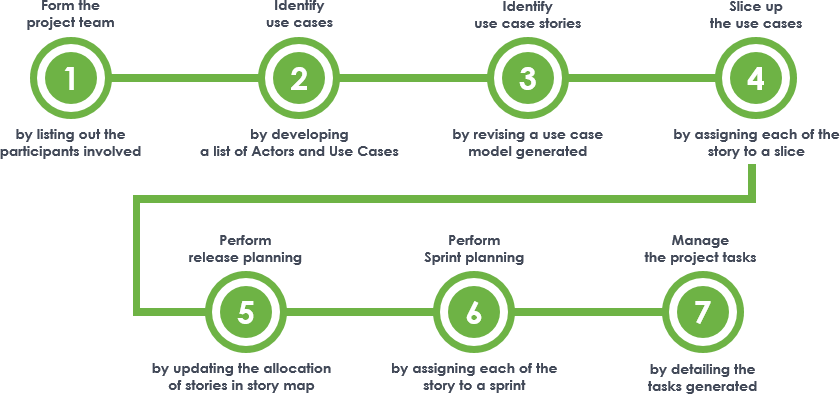
Main Steps
- Maintain a list of people who takes part or will take part in the project.
- Identify the target users of the system (i.e. actor) and the use cases.
- Identify use case stories for the use cases obtained from the previous step.
- Split the use cases into suitably sized slices.
- Decide the use case stories to be completed in each release.
- Decide the use case stories to be implemented in the next few weeks or month by assigning them into appropriate sprints.
- And finally, document the actions required to perform in completing the tasks generated from the user stories.
Try it in Visual Paradigm
Before we continue, if you are using Visual Paradigm you can click the button below to import this tutorial into Visual Paradigm and perform the steps in the form of a wizard.
Open this Wizard in Visual ParadigmStep 1: Form the project team
Maintain a list of people who takes part or will take part in the project. Be sure to include the people who are responsible for managing the use cases to be identified. If you are uncertain right now, you can leave it first and perform this steps later on.
To complete this step, you need to perform the actions below:
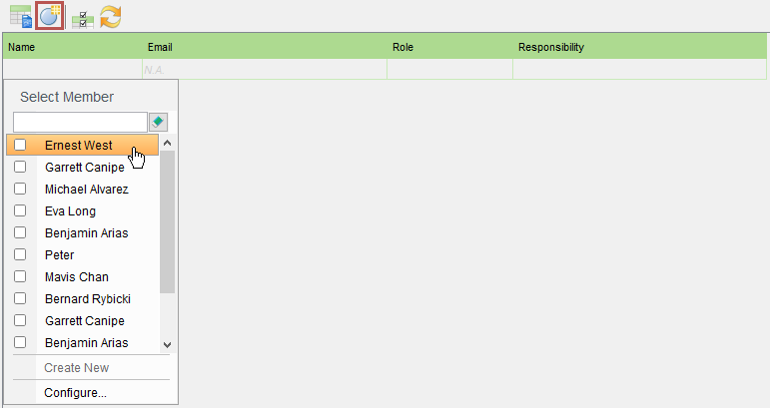
1. Click on Participant at the bottom left of this screen.
2. Add into the table the team members who will take part in the use case identification and management process. To do this, click on the New Participant (Insert) button on top of the table (See the red box in the image below), and select a member to add from the drop-down menu.
Notes:
- By selecting a non-project member, he/she will be added into this project.
- If you want to add a member that does not have an account yet, enter his name in the empty text box above the table and click Create New. Then, enter his/her email address. An invitation email will be sent to him/her for confirmation.
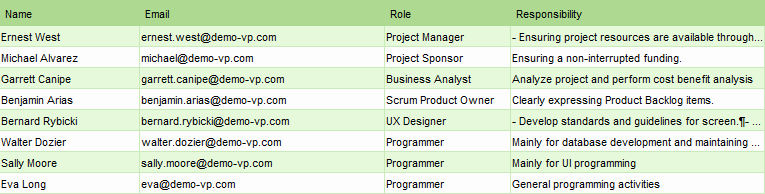
3. Enter the role and responsibility of that member. Double-click on a cell to edit it.
3. Repeatedly add the other team members into the table.
Step 2: Find actors and use cases
This step requires you to identify the target users of the system (i.e. actor) and the use cases, which are the goals that the target users wish to achieve by using the system.
Actors: The person or entities who will access the system to gain something (of value). You should name the role of these person (e.g. Customer, Student, and Teacher) and entities (CCTV System), NOT the names of individuals.
Use cases: A use case is a goal to be achieved by using a system. For example, a typical ATM system has use cases like withdraw cash, transfer cash and check balance. Mind that a use case is a goal, not a function. A single use case represents all the ways to achieve a particular goal. We will explore that in coming steps.
A possible way to find actors and use cases is to hold a workshop with your stakeholders. There is no need to identify all the use cases up front, just focus on those that can provide the stakeholders with the value they look for.
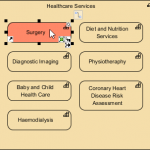
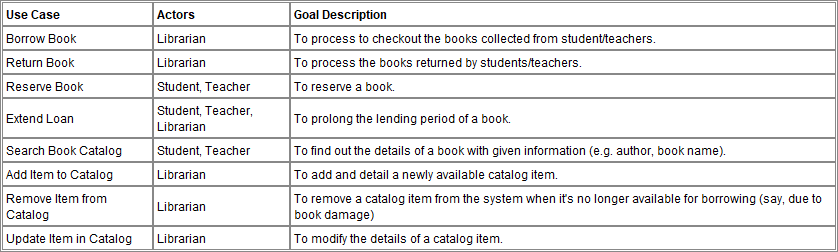
The tables below gives an example of actors and use cases of a Library Management System of a school.
Step 3: Identify use case stories
Use cases capture the goals to be achieved by using a system. To capture requirements and drive the incremental development of the system, tell the "stories" of the use cases.
A use case story describes a specific way of achieving a particular use case. Each use case story is defined by one of the following:
- The basic flow that describes the simplest way of achieving the goal
- An alternative path to achieve the goal
- An exceptional path
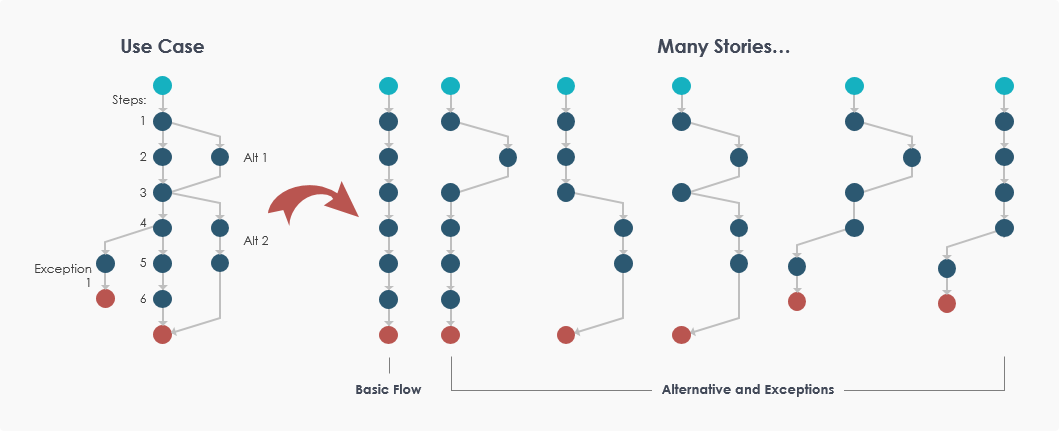
The figure above illustrates the relationship between a use case and use case stories. A use case has at least one story that describes its basic flow, and other stories that describe the alternate and exception flows. The basic flow captures the most typical way to achieve the use case, while the alternative flows identify any other ways of using the system to achieve the goal, and any problems that could occur on the way to achieving the goal.
Note that you don't need to capture all of the stories up front. When you record the basic flow you will naturally think of the other ways of achieving the goal, and the problematic situations that may occur at each step. Just capture these as stories first. You can come back to creating more stories later as and when they are needed.
The table below provides some examples of use case stories.
| Use Case | Use Case Stories |
| Borrow Book |
|
| Return Book |
|
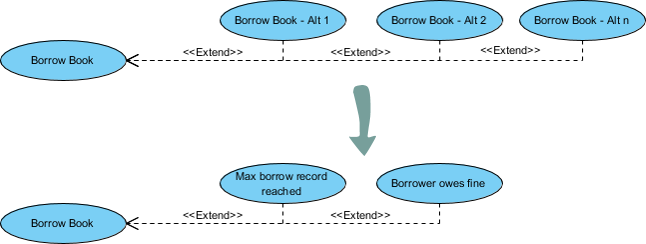
In this step, you are required to identify use case stories for the use cases obtained from the previous step. This is done by editing an initial use case diagram we generated for you by including the use case stories as <<Extend>> use cases. Complete the items below to finish this step:
1. A use case story is modeled as an <<Extend>> use case. Rename the <<Extend>> use cases we created for you. Add more <<Extend>> use cases as needed. Delete the ones not needed. Read the second tips below to learn how to create an <<Extend>> use case in detail.
Note: You do not need to model the basic flow of the use case as it is represented by the base use case.
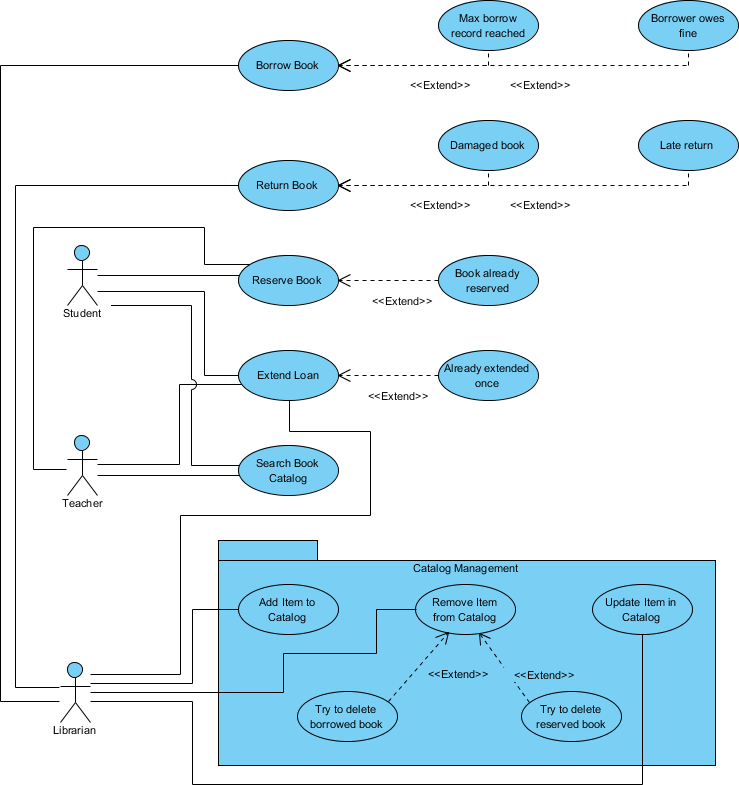
2. Touch-up the layout of the diagram. The figure below shows a use case diagram example for the Library Management System.
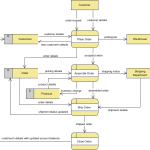
What is a Use Case Diagram?
A Use Case Diagram is a visual form of a use case model. In a Use Case Diagram the people (and other parties) that use the system are modeled as actors, while the ways that the system will be used to achieve goals are modeled as use cases. Such a visual model provides the context for discovering, sharing and understanding system’s requirements. It also provides an overview of all the things the system will do.
How to create an <<Extend>> use case?
Take the steps below to create an <<Extend>> use case.
1. Place your mouse pointer over the use case.

2. Press on the Resource Catalog button and drag it out.
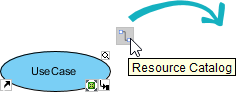
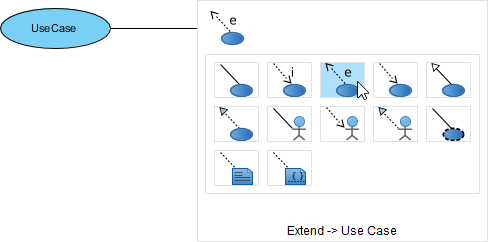
3. Release the mouse button at the place where you want the <<extend>> use case be created. Select Extend -> Use Case from Resource Catalog
4. Name the use case and press Enter to confirm.
Step 4: Slice up the use cases
Most systems require a lot of work before they are ready for production use. They have many requirements with varying importance and priority, and most of which are dependent on other requirements being implemented before they can be satisfied. Because of this we need a way to divide the use cases into smaller pieces that allow us to plan and implement a system based on a set of appropriately sized, organized and ordered work items. This is the approach taken by Use-Case 2.0, where the use cases are split up into slices, and where the system itself is evolved slice by slice.
A use case may generate several slices covering all its functionality. Each slice contains one or more stories selected from a use case, forming a work item that is of value to the stakeholder. The figure below illustrates the relationship between use case, use case slice and use case stories.
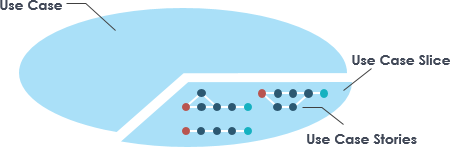
Use case slice is the most important component of Use Case 2.0. It is as integral to Use-Case 2.0 as the use case itself. It is the slices that enable the use cases to be broken down into suitably sized pieces of work, driving the development of a system to fulfill them.
In this step, you are required to create slices for the use cases. The best way to find the right slices is to think about the stories captured. Each story is a good candidate slice. The table below shows several examples of how slices can be created based on stories.
| Use Case | Use Case Stories | Use Case Slice |
| Borrow Book | Borrow Book (Basic ) | Borrow Book success |
| Borrow Book | Max borrow record reached | Borrow Book failed |
| Borrow Book | Borrower owes fine | Borrow Book failed |
From the table, you can see that the Borrow Book use case is split into two slices - Borrow book success and Borrow book failed. It is acceptable that a slice contains one story, or multiple stories. In fact, the slicing mechanism is very flexible. It enables you to create slices as big or small as you need to drive your development. However, you should do the slicing with your stakeholders to ensure that all the slices created are value delivered. Don't slice up all the use cases at once. Just identify enough slices to meet the immediate needs of the team.
Now, complete the items below to finish this step.
1. Review the use case stories identified, use case by use case.
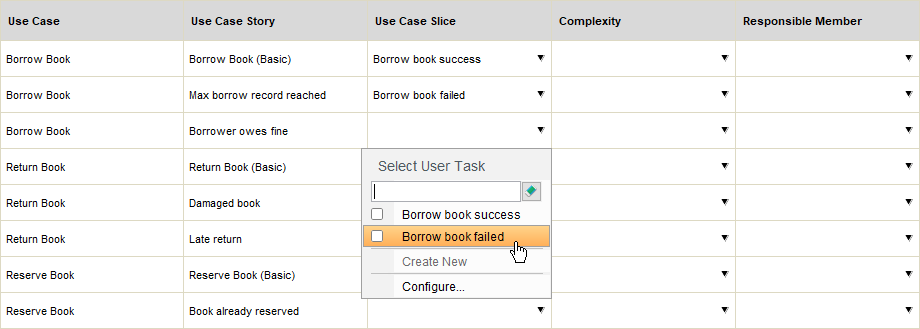
2. For each use case story, assign it to a slice. You can create a new slice or select an existing slices to add the use case story into. To create a slice, toggle the drop-down menu in the Use Case Slice cell, enter the name of the slice in the text box and click Create New
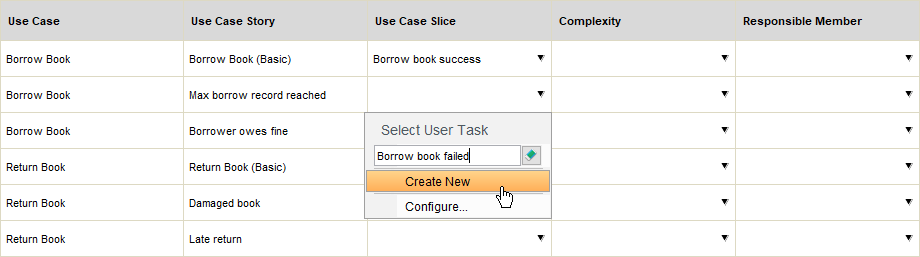
To assign a use case story into a slice, simply select the slice from the drop-down menu.
3. Assess the complexity of each use case story.
4. Select a team member as the responsibility person of the use case story.
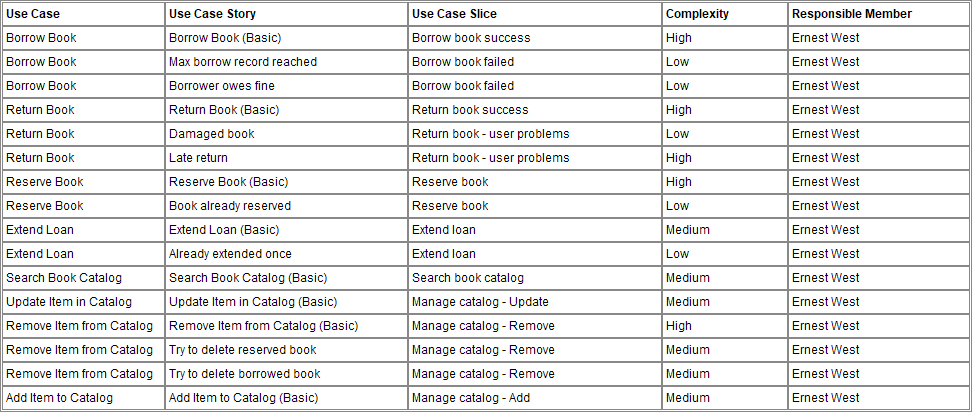
The table below gives an example of how a use cases of the Library Management System can be sliced up into slices.
Step 5: Perform release planning
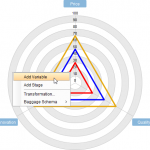
Software systems evolve through a series of releases. The releases themselves are often not produced in one go, but are evolved through a series of increments. In the world of agile, we call the increments 'sprints'. In this and the next step, you will start planning your development work by assigning the use case stories into appropriate releases and sprints. You are going to work in a user story map transformed from the use case, use case slices and stories identified. Before we continue, let's take a look at how a user story map looks like.
The various Use Case 2.0 elements are transformed into different story map elements. The mapping is as show below.
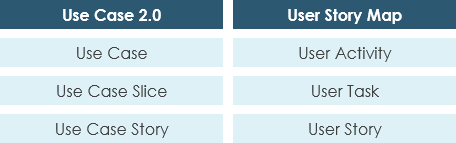
This step requires you to establish a backlog of the user stories (i.e. use case stories) left to implement. Complete the items below to finish the step. Make sure the opinions from stakeholders are considered throughout the whole process, or you simply perform this step with them.
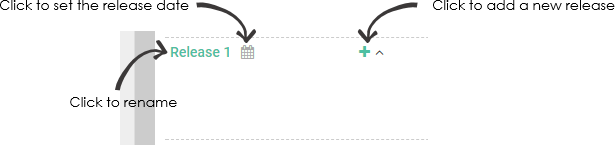
1. Set up the releases of the project by creating the release compartments, giving each release a meaningful name (e.g. its version number) and the release date.
2. Drag the user stories into the release compartments.
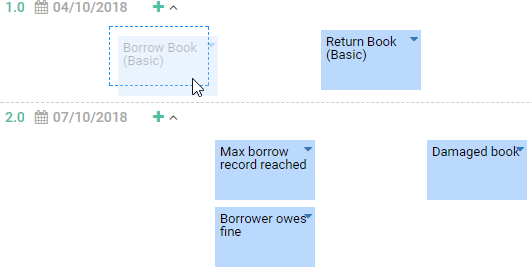
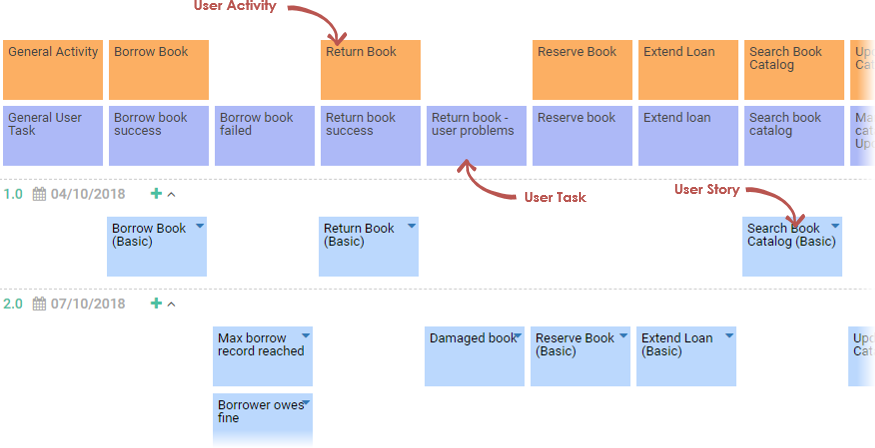
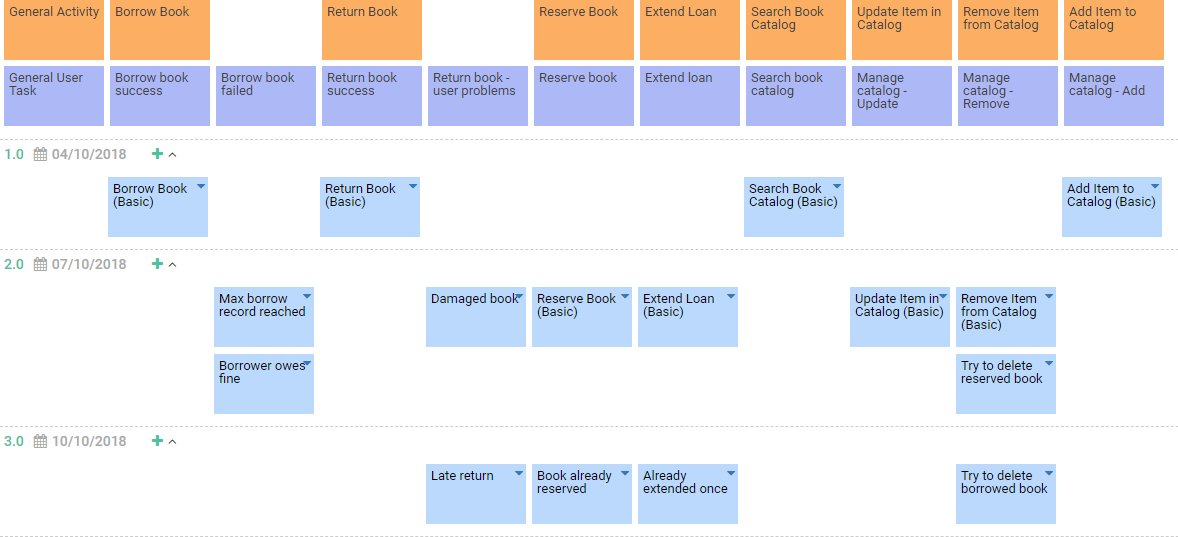
The figure below shows how use case stories can be managed in a user story map.
Step 6: Perform sprint planning
Decide the use case stories to be implemented in the next few weeks or month. This is done by adding those user stories into a logical, time-boxed iteration, known as a sprint.
A sprint usually last for around two weeks to one month. The development team is expected to complete all the use case stories within the sprint by the end date of the sprint, as agreed by all parties in sprint planning. A project has multiple sprints and, by the end of each sprint, a semi-executable product will be delivered for the end user to test or even to use in production.
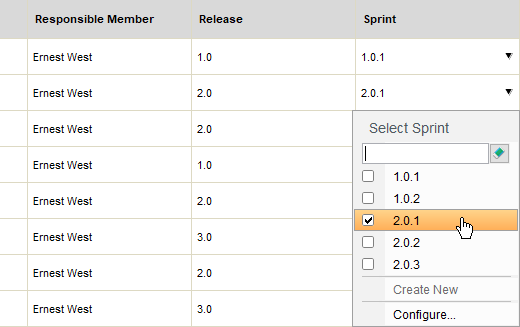
Complete the table by assigning use case stories into sprints. You don't have to assign all use case stories at once. Just focus on the user stories to be delivered in the first or first two sprints first. You can perform the assignment for the remaining stories later on, base on the progress, the capability of the team and user's latest expectation. To create a slice, toggle the drop-down menu in the Sprint cell, enter the name of the sprint in the text box and click Create New. To assign a use case story into a sprint, simply select the sprint from the drop-down menu.
Step 7: Detail the development tasks
The sprints are set up and your team is now ready to design, code, perform unit test, and integrate the software components needed to implement the stories in sprint.
A set of tasks have been generated in Tasifier, the task management tool, for each of the stories in the sprint and assigned to the team members who are set responsible to the stories. Members can view the tasks in Tasifier and start to manage the development activities associated with the stories. In this step, you are required to detail the tasks by including the things that the members have to achieve under the tasks.
Let's take a look at the interface of Tasifier and see the actions that you have to perform under this step. When you open Tasifier under this step, you will see something like:
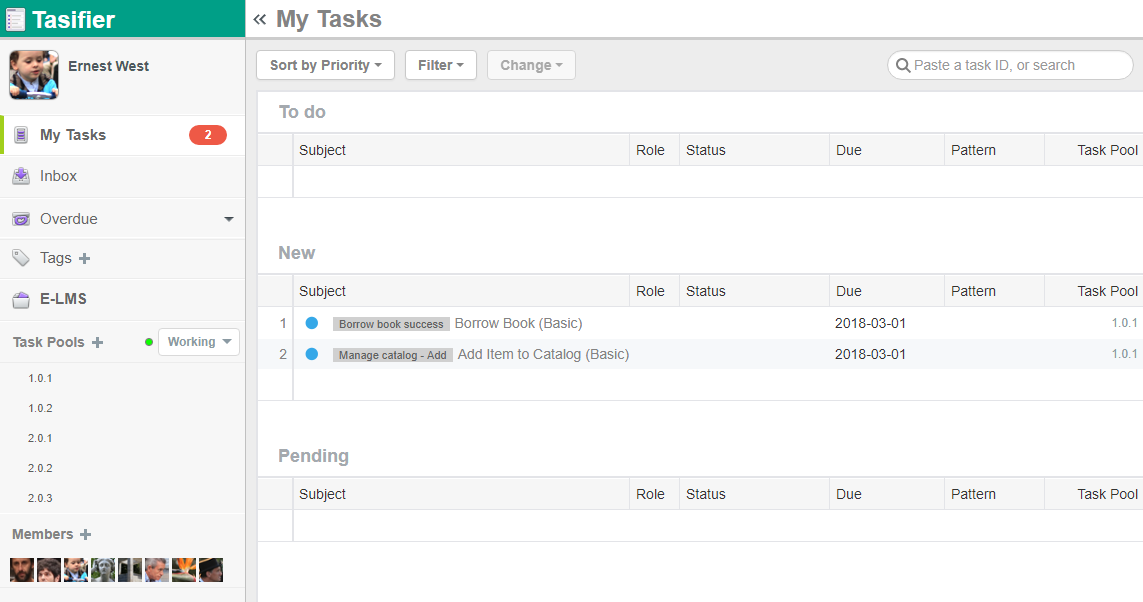
Each use case story identified results in the generation of a task in Tasifier. The tasks are automatically assigned to the team members who are set responsible to the stories. Members can access the tasks under the New section of Tasifier. They can click on a task to view and edit its details.
Note that only the tasks in the first sprint are presented. The tasks in subsequent sprints will only be presented when the start date is passed. Yet, you can always read and detail these tasks. We will talk about it in more detail.
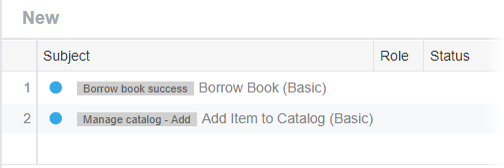
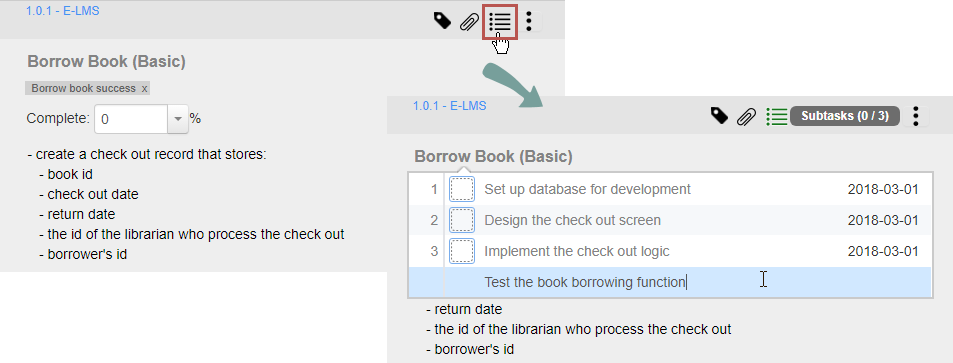
You can see a tag attached to each task (e.g. "Borrow book success" in the image below). The tag is actually the use case slice the story (i.e. task) belonging to. If you want to check the stories under a particular use case slice, click on the tag. This will open a page that lists the tasks created from the stories under that slice.
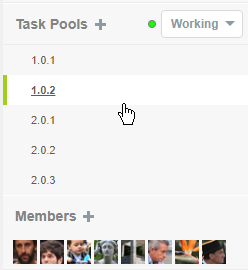
On the left of Tasifier, you can see a list of 'Task Pools', which are the sprints set up in the previous step. You can click on a sprint to view the tasks required to complete under that sprint.
Based on the discussions with stakeholders and among the team, document the actions required to perform in completing each task.
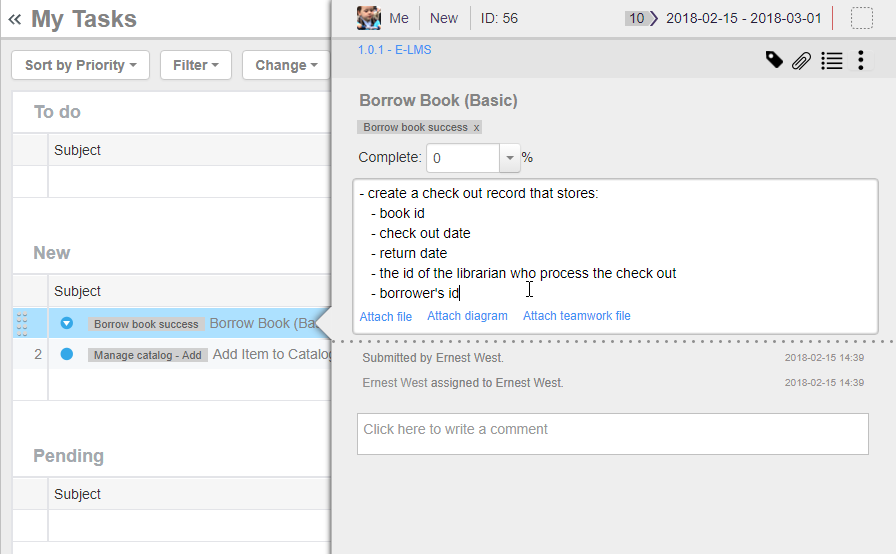
A story-level task could be too big to manage. You can create sub-tasks in managing the actual development activities. To do this, click on the Sub-tasks button, and then enter the sub-tasks one by one.
Ready to try?
Click the button below to import this tutorial into Visual Paradigm and start developing MVC Sequence Diagrams for your system. The wizard not only provides the steps and guidance but also automates the transition of data among steps.
Open this Wizard in Visual Paradigm
Import into your Project
Open diagram in Visual Paradigm [?]Copy the URL below, paste it in the Open Project windows of Visual Paradigm and press Enter to open it |