Open post

Business Start-Up

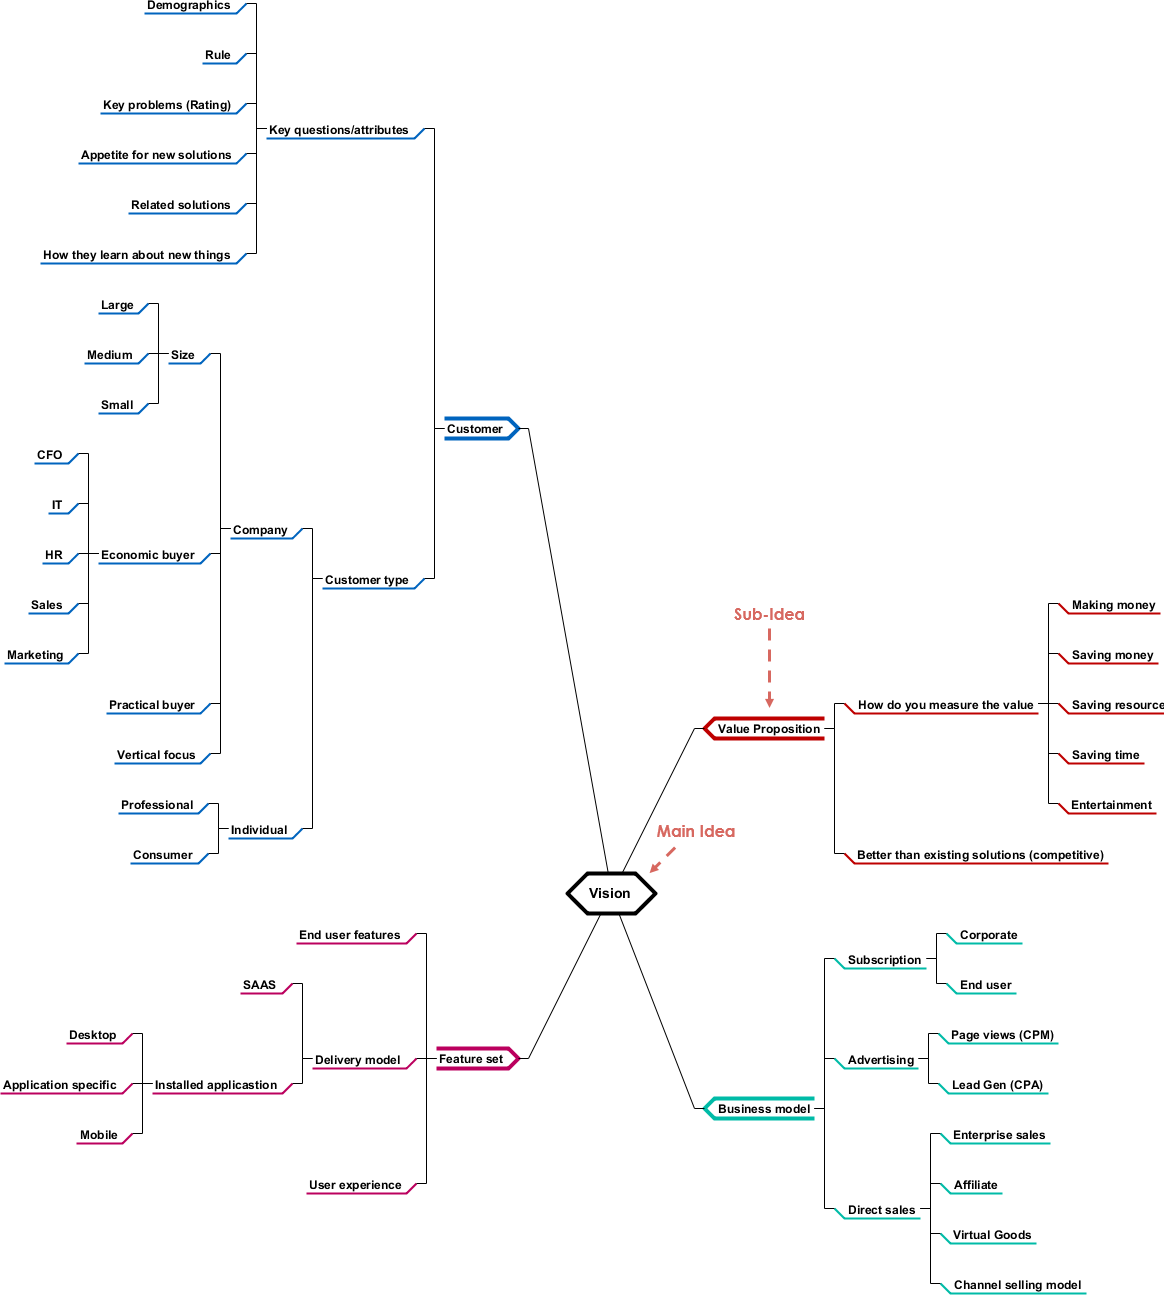
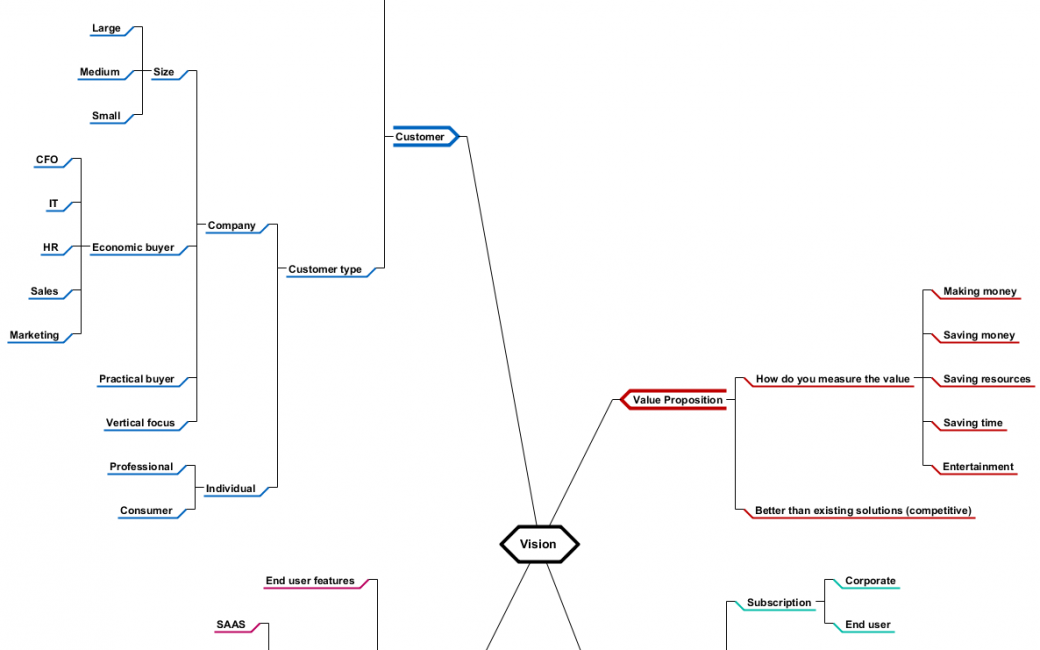
How to use Mind Map for brainstorming a Business Start-up? Here is a mind map template that focuses on the core elements of any start-up - Customer, Value Proposition, Feature Set and Business model. In a perfect world, each of these concepts relates to each other in a cohesive story.  For example, if your value is saving someone time, are there any features that can be introduced for saving more time for your customer. Is there a way to quantify the time saved?

Import into your Project

Posted by:

Open post

Stakeholder Analysis

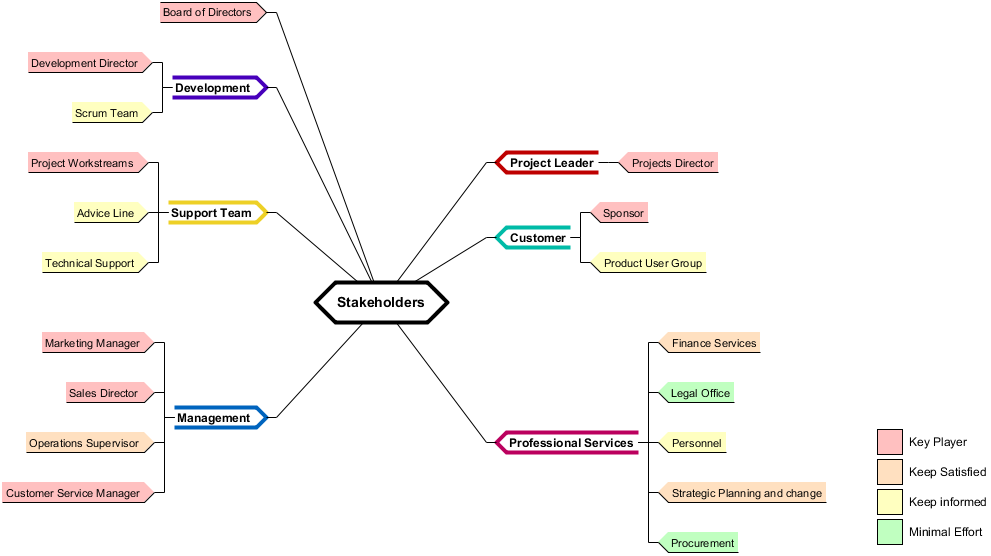
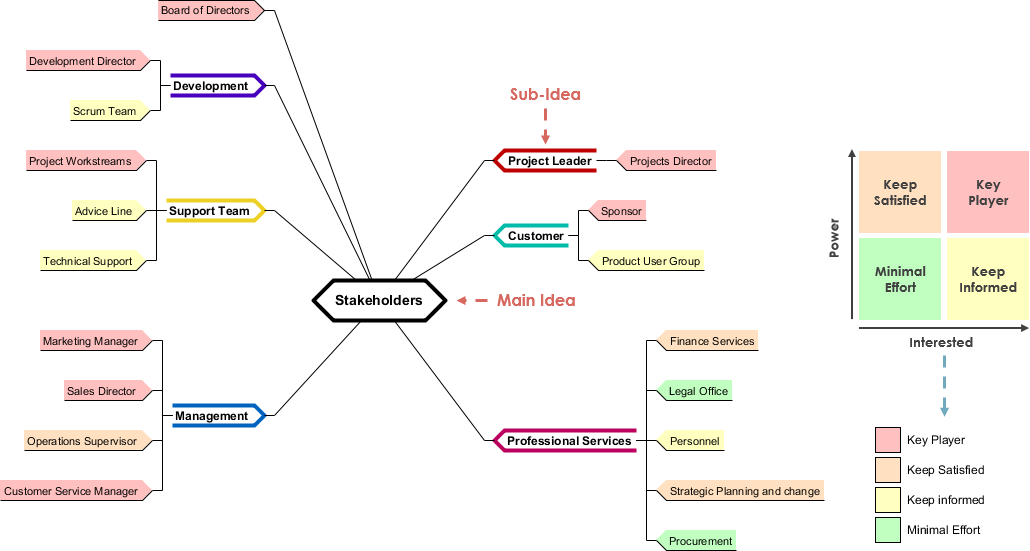
This mind map example shows you how mind map can be used for stakeholder analysis. Stakeholder analysis in conflict resolution, project management, and business administration, is the process of the impact of a decision on relevant parties. This information is used to assess how the interests of those stakeholders should be addressed in a project plan, policy, program, or other action.

Import into your Project

Posted by:

Open post

Risk Management Plan

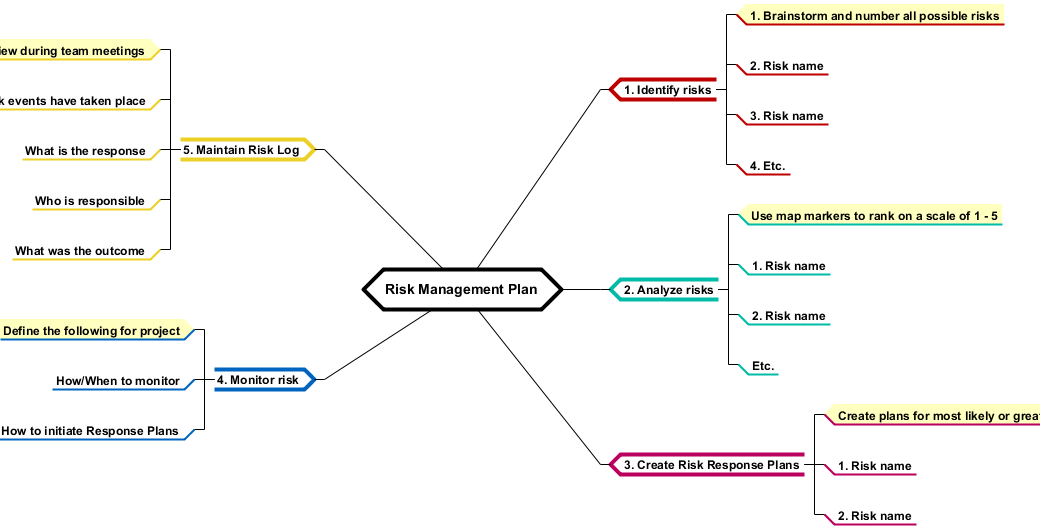
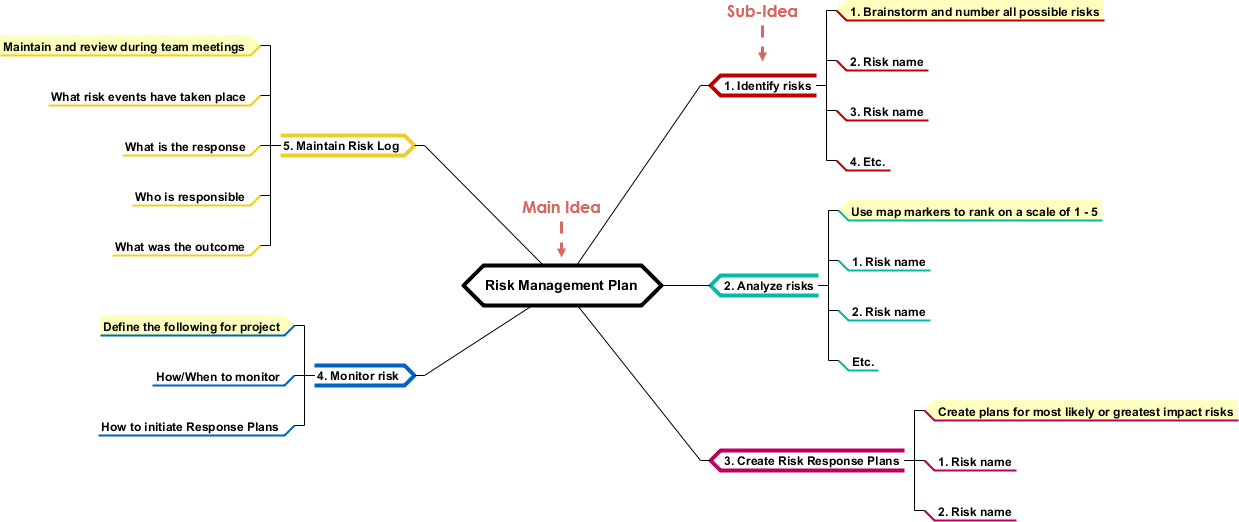
How to use Mind Map as Risk Management Tool? If any aspect of your job involves identifying and planning for potential risks, then a mind map can be a great way to do this, especially in the early days of identifying risks and brainstorming scenarios and solutions. In this Risk Management process, it involves of 5 steps for the risk management lifecycle: 1. identify, 2. analyse, 3. create risk response plans, 4. monitor risk, and 5. maintain the log.

Import into your Project

Posted by:

Open post

Child Care Center

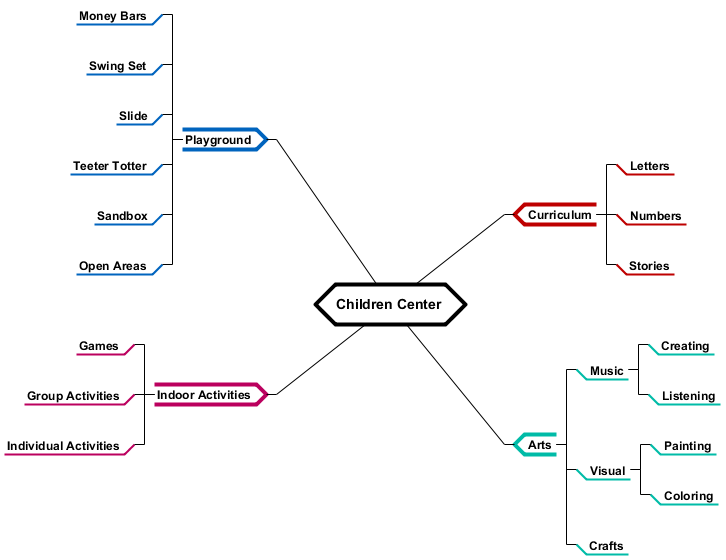
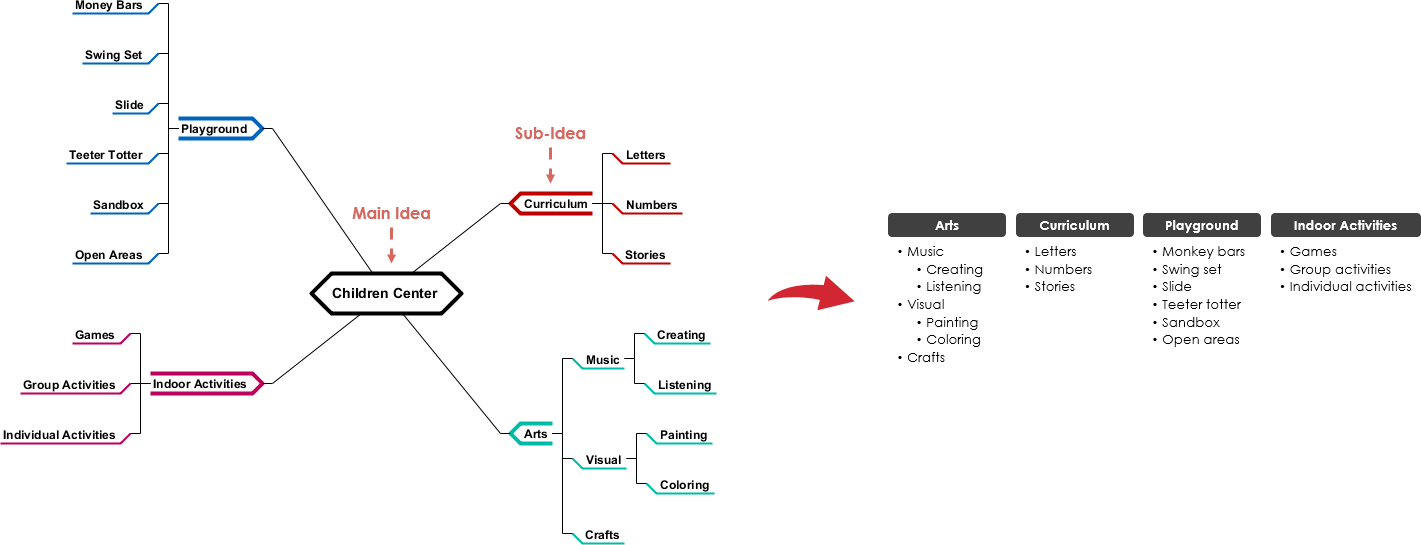
mind map is a technique that starts with the idea (or in this case, the project) in the middle, and then stakeholders branch out from the central idea and generate more ideas (or in this case, requirements). An affinity analysis takes ideas and groups them into categories with similar ideas or requirements.

Step for performing affinity analysis;

  1. Pick a central idea, in this case, childcare
  2. Think of the major topic around the central idea, in this case, curriculum, arts, playground and indoor activities
  3. Branch out further into sub-categories
  4. Summarize the diagram into tabular format.

Let's read through this mind map example for more details.

Import into your Project

Posted by:

Open post

Business Motivation Model (BMM)

Assists you in developing a Business Motivation Model (BMM) that aids business planning. By following the process step-by-step, the core elements of business plans will be identified and archived in document form.

Hi, everyone. This is Jick Yeung from Visual Paradigm. In the next few minutes I will show you how to utilize the Business Motivation Model guide-through process. Before I start I want to give you a brief explanation of BMM, which is the business motivation model, as well as the guide through process.

So, what is BMM?

BMM is the short form of business motivation model. It provides a structure for developing business plans. Generally speaking, by developing a Business Motivation Model you know the answers of:

What an enterprise wants to be? Does it want to be the most famous brand or does it want to focus on changing people's life, or even changing the world?

How to become what it wants to be? What's the strategy to take?

What are the factors that influence the goals and directions of the enterprise?

What are the potential impacts that may affect the achievements of goals and executions of strategies?

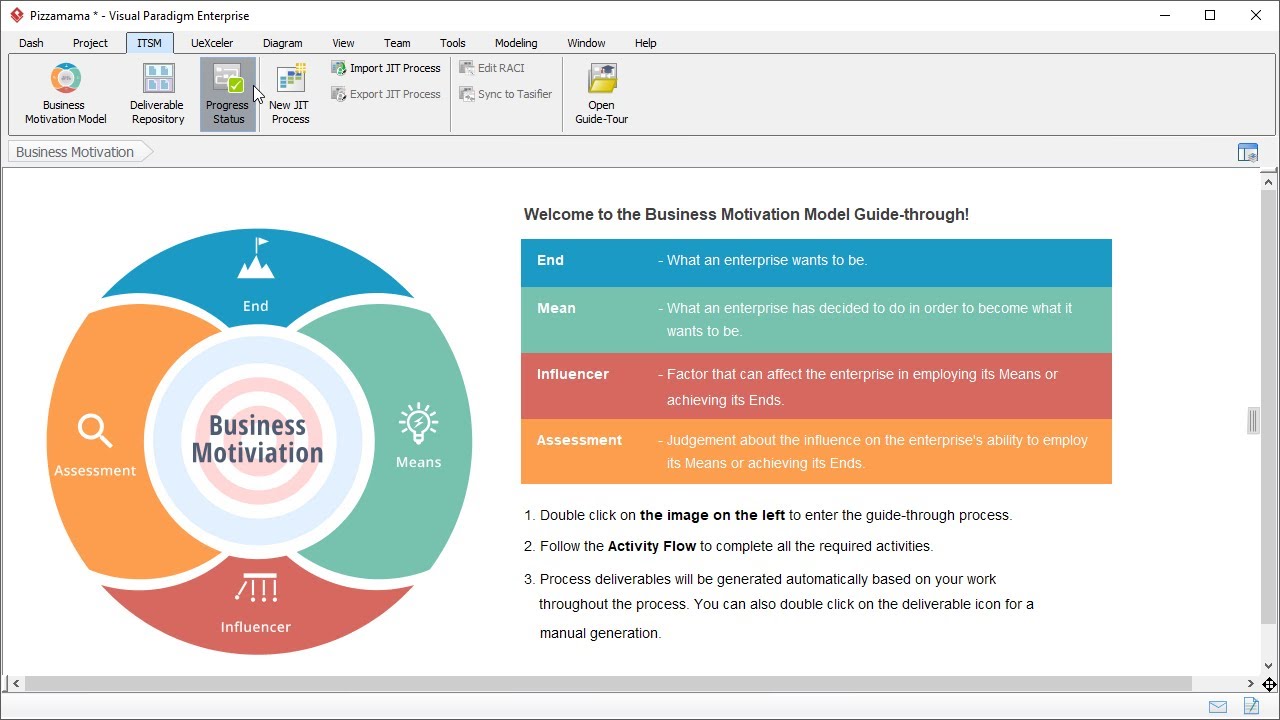
BMM expresses the answers of these four questions as Ends, Means, Influencers and Assessments.

The BMM guide-through process, as its name suggests, guides you through the identification of these elements. As you advance through the process, BMM elements are identified, business plan documents will be generated automatically.

I think I better stop here and carry on to the demonstration. You will know what a Guide-through process is in a minute.

This is Visual Paradigm. To open the BMM Guide-through process, select ITSM from the tool bar and select Business Motivation Model.

This is the entry screen of the BMM Guide-through process. On the right hand side you see some instructions giving you some hints in using the guide process. On the left hand side there is a circle which shows the four core elements of BMM – The End, Means, Influencers and Assessment.

Let's double click on the circle to open the Guide-through process.

This is the BMM Guide-through process. This screen is mainly divided into two parts. On the left hand side there is the process and on the right hand side there is a list of deliverables. As you advance through the process these deliverables will be generated automatically, but still you can generate any of them manually.

These deliverable icons allow you to perform a manual generation. We will talk about it by the end of this video. Let's focus on the Guide-through process first.

The guide through process starts by identifying organization unis. Organizational units are performers who are responsible for activities in an organization or in creating the business motivation model. They are connected with many different parts of the BMM so the first thing you have to do is to identify them.

After that you follow the flow, reaching the Vision, Goals and Objectives. These three elements shape the End of BMM. It means what an enterprise want to be.

After that you identify the Mission, Strategy, Tactic, Business Policy and Business Rule. These five elements form the means of BMM, which is what an enterprise want to do to become what it wants to be.

And then you identify the external and internal influencers. Finally you perform assessment of the influencers to determine the impact of these influencers on the enterprise. We will go through all these elements in a minute.

The first activity is to identify organization units. Double-click on this box.

Two steps are required in completing this activity. The first step is to define the categories for organization units. The second step is to list the organization units.

For each step there are instructions telling you what you have to do to complete the step. There are also samples for you to follow.

Now click this button to perform the action required under this step.

These steps requires entering the categories of organization units. A list of common categories is provided. You may modify the list by adding categories and removing any of them. I'm happy with the list now so I'm not going to modify it.

So, I just go back and click this button to complete this step.

So now I'm going to perform the second step, which is to list the organization units. Again I can view the instructions the samples before I perform any action.

So now I'm brought to an empty form for listing the organization units. I enter the name of the first unit “Pizzamama”, which is the name of the enterprise we used in this demonstration. Category, the categories you defined in previous steps are listed here. So I just select the category I need, which is “Cooperation”, and enter the rule of this organization unit.

I’ve finished entering the first organization unit. I want to add a few more units. To do this, right-click on any cell in the row and select Insert Row Below.

A new row is created. Then I can start entering the second organization unit.

So, I've finished listing all the units involved in the model. I just go back and click this button to complete the step.

Alright you can see a message is populated here. It says that a document “Organization Unit.docx” is automatically generated. I will show you what it is later on, let's just skip it first.

We finished this activity. Now I go back to the process first.

The tick here indicates that the activity is completed. By following the flow the next activity to perform is to identify business vision. Just double click on the Vision box to open it.

The only step to perform is to write business vision statement, or statements. So I just click here to perform the action required.

Again you see the form of a vision statement. Just like what I did before, enter the vision statement of the enterprise, which is, in this case, “Be the city's favorite pizza place”.

BMM encourages users to specify the person who define the BMM elements. So here we select the person who define the vision statement.

Besides clicking on a triangle you can press Ctrl + Space to toggle the selection box.

These are all the organization units defined in the previous activity. We just select the person to define this vision statement.

And enter the date of definition.

The enterprise has only one vision so I just stop here and go back.

Complete.

So I can move on to the next activity, which is to define the goal, the business goal. Double click to open it. Let's see what I have to do now.

I just enter the business goals one by one the. First goal is to deliver pizzas in an expedient amount of time. This goal is defined to satisfy a vision. Here I can select the vision from the vision defined in the previous activity.

Again I have to select the person who define this goal.

And the date of definition.

To create a new goal, insert a row. You can insert a row simply by pressing the Enter key.

And enter the second goal.

We're finished defining the goal. Go back, and complete.

Next one – Objective.

Perform the action. Enter the objectives one by one.

Objectives are defined to quantify goals, so just like what we did before, we select the quantifying goals from the list.

So that's the person who define the objective, and the date of definition.

We've finished listing the objectives.

By completing the activities for defining the visions, goals and objectives, the documents business visions, goals and objectives will be generated automatically, and this also finished defining the end of the BMM.

Now we move on to defining the mission.

A mission realizes a vision, so we select the vision here.

Select the person who established the mission, and the date.

Compete the step.

The next activity is to identify the business strategy.

A strategy is under the plan for a mission, so we select the mission here.

A strategy is employed to achieve goals, so we select the goal or goals here.

Finished. So we go back and complete.

Once we've identified strategies we identify the tactics in implementing the strategies.

Tactic implement strategies so we select the strategies here.

Tactic also achieve objectives.

We finished, so go back, and complete.

I think better stop here because the tactics for completing the other activities are more or less the same, so just follow the flow to complete the rest of the process.

When the process is completed you will see the tick symbols appear at the top right of all the activities.

As said before as you advance through the process business plans documents will be generated. These documents are automatically archived in the place called Deliverable Repository. Let me show you where it is.

Select ITSM, and Deliverable Repository.

This is a file cabinet. Those documents are put under these drawers. To find a document, double-click on the drawer.

This is the documents generated. Double-click to open it.

You see the organization units. These are the organization units we defined earlier.

Let's check another one. Business directives.

These are the goals, objectives. This is a list of business policies, and the list of tactics along with how they are governed by business policies. Business rules, how the strategies are governed by the rules, and etc.

You can also generate a documents manually. To do this go back to the Guide-through process.

Double-click on the deliverable that you want to generate. Let's say we want to generate a document of influencer assessment, so we double click on the icon here.

That’s it. This is how the BMM Guide-through process works.

Thank you for watching this video. Good bye.
Open post

Free Diagram Templates and Examples

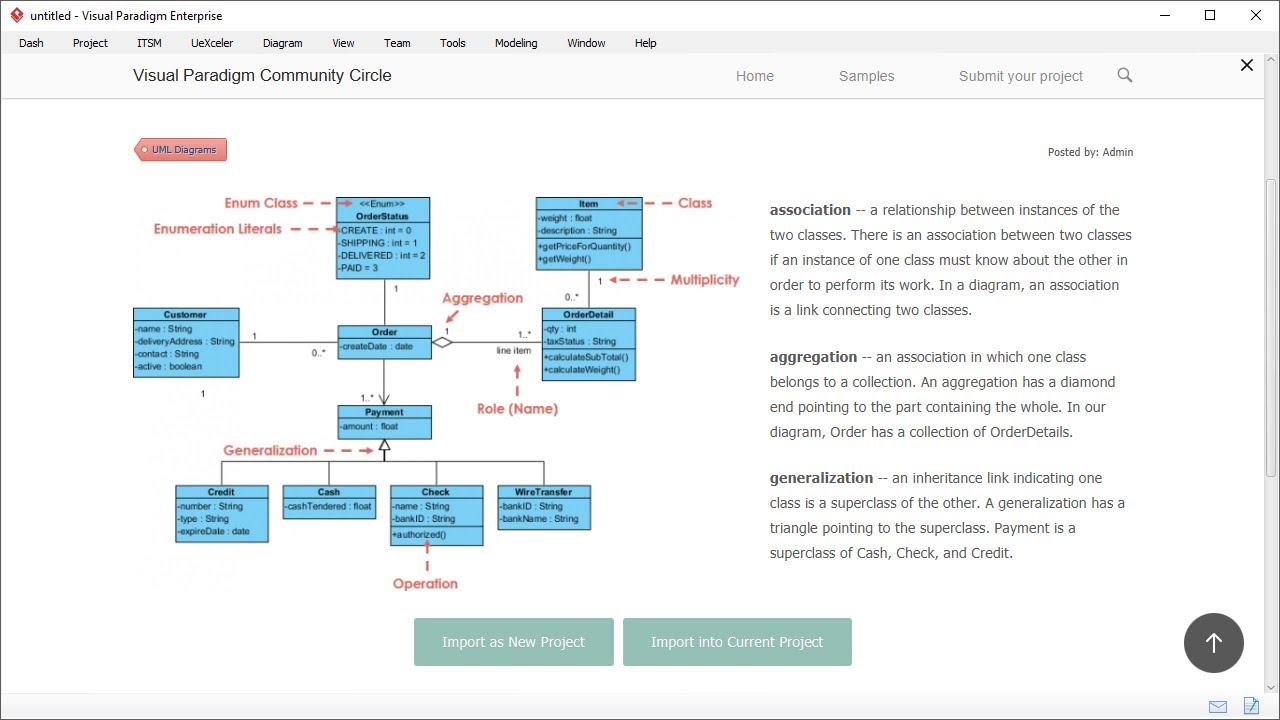
View and learn Visual Paradigm by importing selected diagrams straight into the Visual Paradigm platform for experimenting, practicing and making your own! You can also take advantage of the annotated examples in learning different modeling languages such as UML, ArchiMate, BPMN, etc.

Hi everyone, this is Jick from Visual Paradigm. In this demonstration I'm going to show you how you can learn a diagram from examples shared by others. To begin with, select Project, and Community Circle.

Visual Paradigm community circle contains many diagram templates and examples shared by our users. By scrolling down you see different categories like UML diagrams, BPMN diagrams, mind map, data flow diagrams, ArchiMate, PERT Chart, and etc.

If I click on a diagram category, the diagram examples of that type are listed, so I can click on an example.

There is a description that description this example, and the diagram.

The diagram is annotated. You can learn the diagram by studying the notations used.

Let's take a look at another example.

Class diagram. This is the sales order system example.

Besides learning you can also import an example into your project and modify it to make it to become yours. You can import into a new project or imported into your current project. Let's import into the current project.

The class diagram is imported into Visual Paradigm. I can make changes like to delete a class, rename class, add attributes and so forth.

This is the end of this video. Thank you for watching. Goodbye.

Open post

Project Management Guide Tour

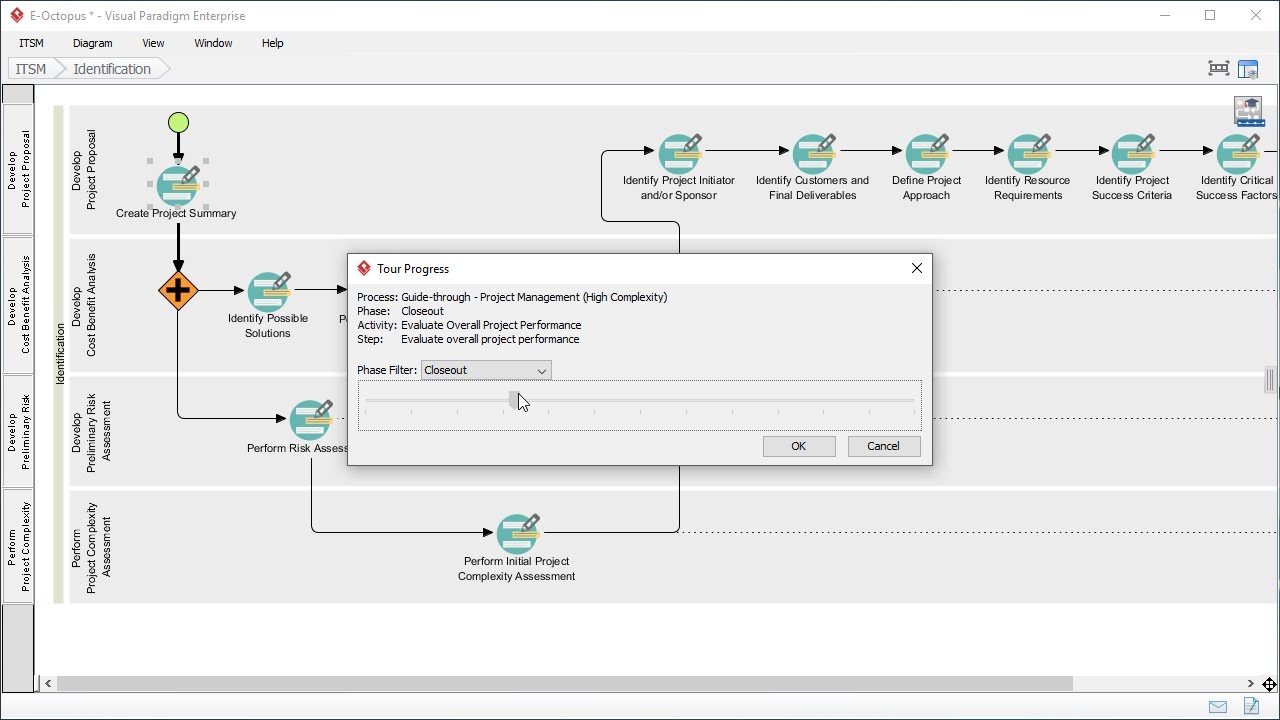
Understand and experience the IT project management lifecycle with a case study. Take a glance of and learn the project management process with guide-tour.

Hi everyone, this is Jick from Visual Paradigm. In the next few minutes I will show you how you can learn the project management lifecycle yourself with the help of the guide tour feature. Before I talk about the guide tour let's have a quick overview of the project management lifecycle first.

This is a project management lifecycle. It consists of five phases – Identification, Initiation, Planning, Execution and Control, and Closeout.

I can double click on a phase to open it.

In each phase there are many activities. Each activity requires you to perform some steps. You read the instruction, view the samples, and perform the actions required. Very often this involves form filling and drawing diagrams.

There are many activities and steps in five phases. To help you understand how things work at a particular point in time, a guided tour was developed.

The guide tour provides you with a case study in understanding and experiencing the IT project management lifecycle. You can take a glance of and learn the process with the help of the pre-populated fields and pre-developed diagrams, and you can try the feature without worrying about messing up your production works. Let me show you how it works.

To open a guide tour, select ITSM from the toolbar, then click on the Open Guide Tour button.

Select the tour. In this demonstration I'm going to show you the guide through process of project management lifecycle.

There are four levels of complexity, which is determined by answering a questionnaire in an activity under the second phase. In this demonstration I'll just select the High Complexity option.

Click OK to open. The application will restart itself.

I'm now in a completely different environment, and this project doesn't contain any of the production data. I can try the Guide-through process by opening the first phase. Open the first activity. Perform the action by filling in the project description here.

Try to play around, and perhaps to enter the business objectives here.

You don't need to worry about polluting your work because as I said it’s a completely different project.

And when you finish you go back, and complete the step, the form data is restored to the default data, provided by the case study. If you want to try again, click the Reset button here.

The form is cleared.

The guided tour allows you to jump to any phase, any activity and even any step of the entire process. To do this, go back to the process diagram first.

Click on this button.

Select the phase I want to visit. Let's say I'm interested in seeing the closeout phase. I select closeout here and select the activity that I want to visit, and confirm.

I'm brought to the closeout phase, the activity “Reveal project shortcomings”, and step.

If I go back to the process diagram, I can see the two previous activities completed. The phases before are also completed.

So, if I open the form I see the data provided by the case study. I can modify the data and complete the step, or I can enter from scratch by resetting the step.

As you can see the form becomes empty. If I want to fill in the form with the default data again, click the Fill in Default Data button here.

The form is filled.

Of course I can also visit the previously completed activities and view the work done.

I can also navigate back to the moment when the procurement planning was performed.

When I finished learning I can go back to the production environment by selecting ITSM from the toolbar, and then Exit Guided-Tour.

I'm back to the production environment.

This is the end of this video. Thank you for watching. Goodbye.

Open post

Migration Roadmap

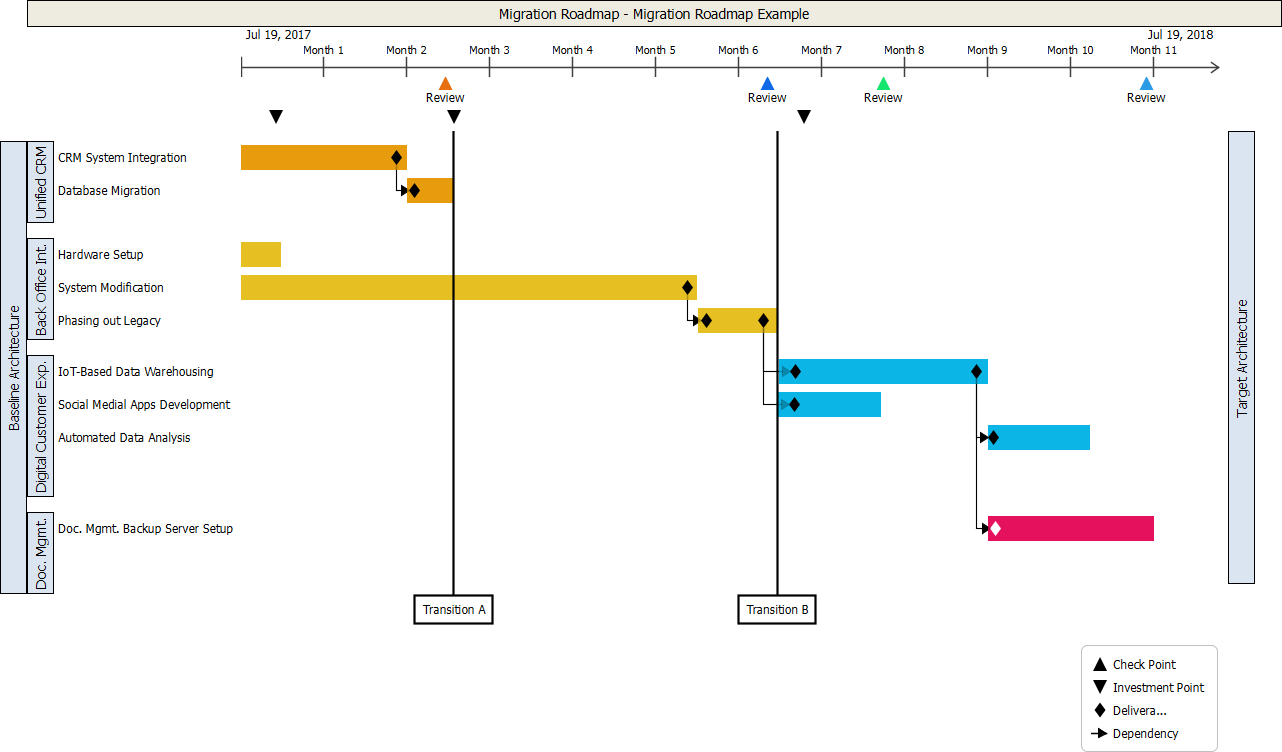
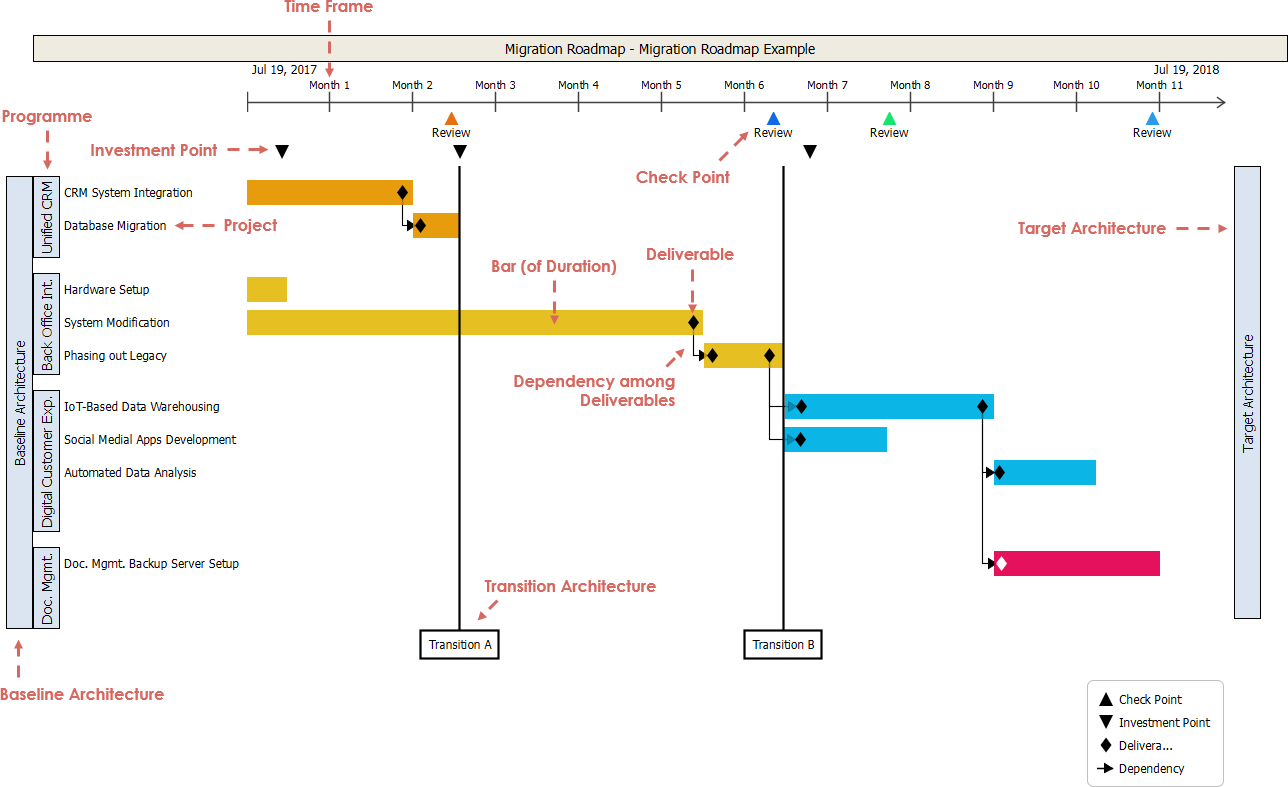
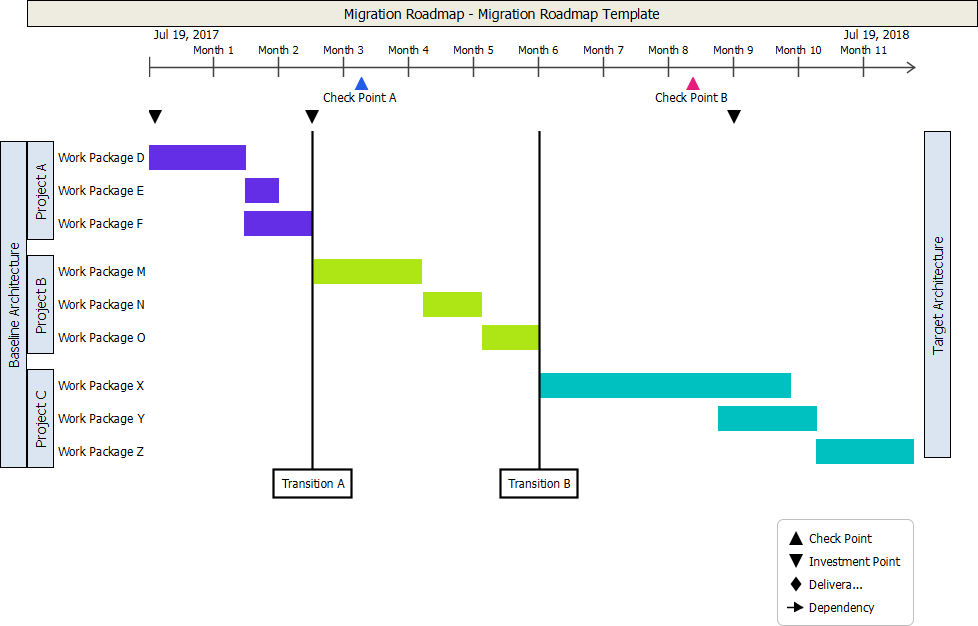
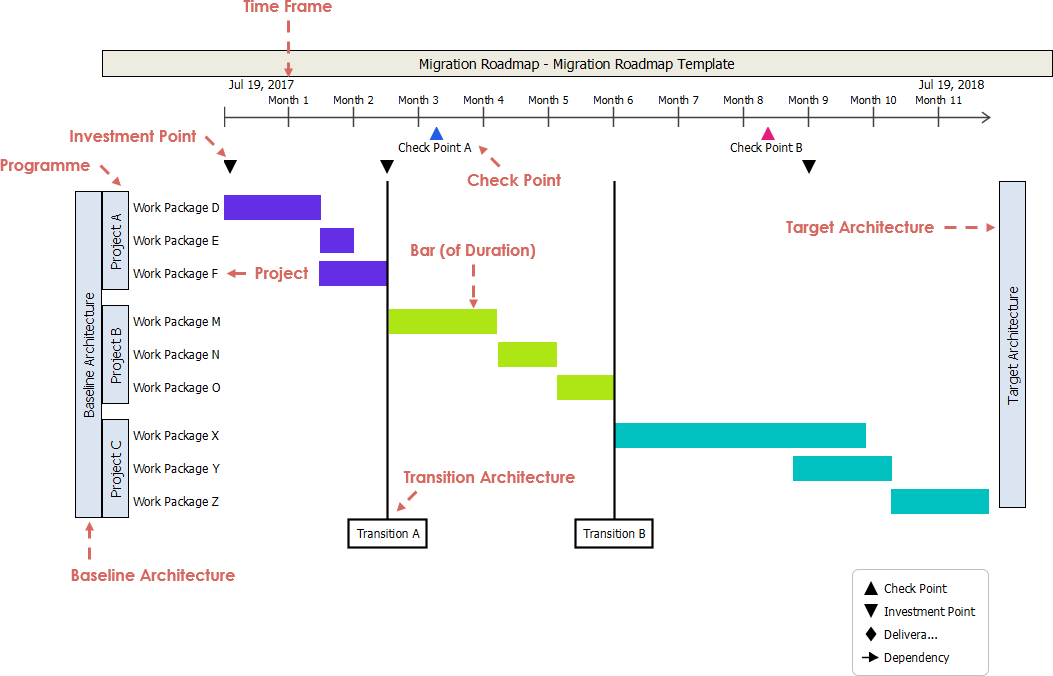
Migration Roadmap represents the time frame of individual sub-projects and the critical transitions, using a migration roadmap. You can also indicate the moment when a project reviewed and investment will take place throughout the project life-cycle as well as to present the project triggers through the production of deliverables.

Import into your Project

Posted by:

Open post

Migration Roadmap Template

Import into your Project

Here is a migration roadmap example. A Migration Roadmap represents the time frame of individual sub-projects and the critical transitions. You can also indicate the moment when a project reviewed and investment will take place throughout the project life-cycle as well as to present the project triggers through the production of deliverables.

Posted by:

Open post

Implementation Plan Diagram – Software Project

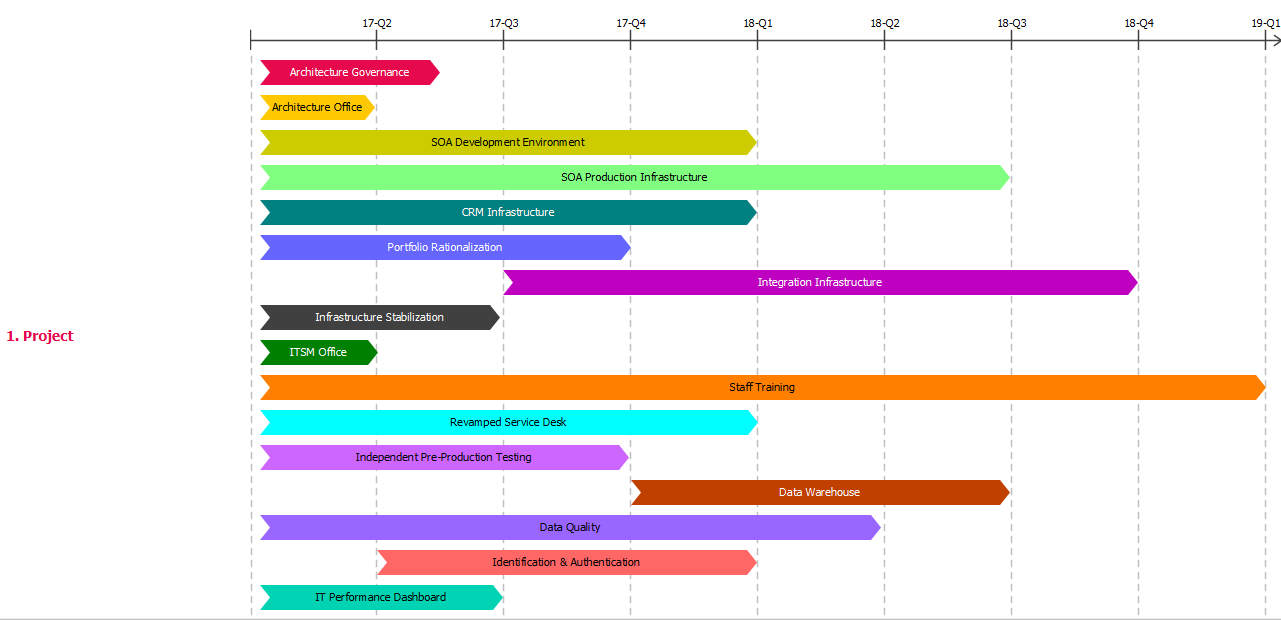
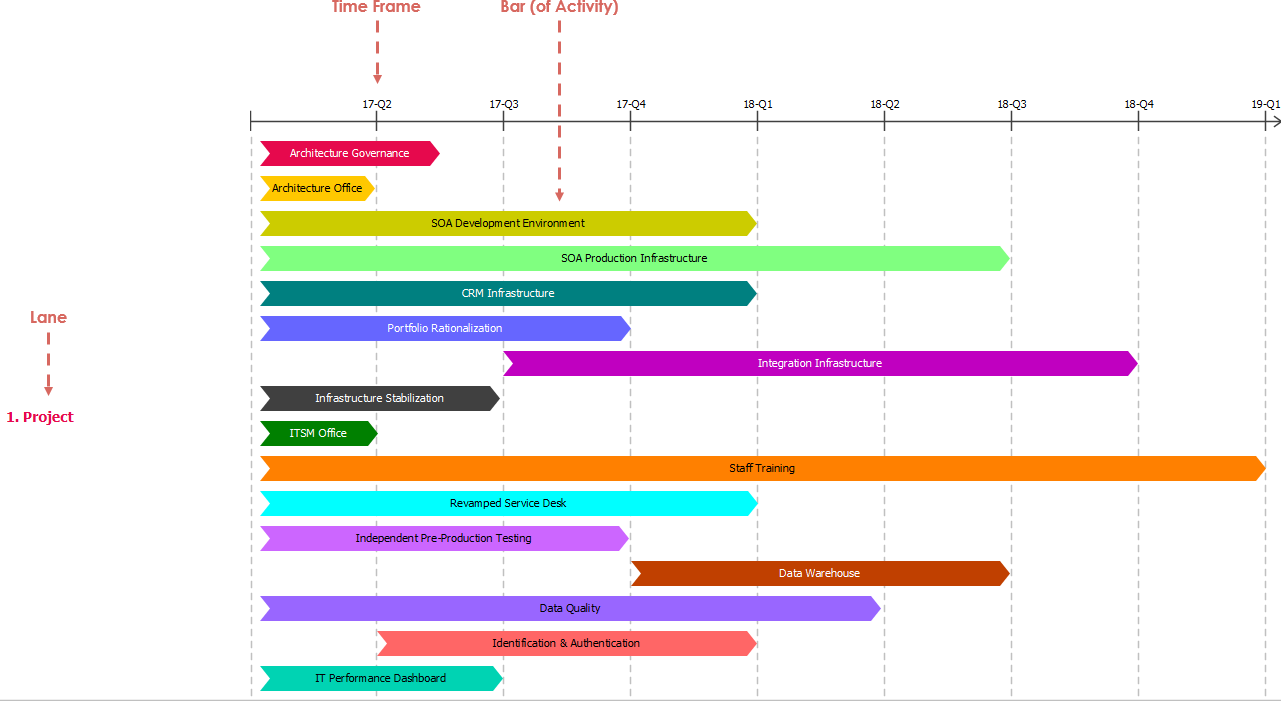
Missed deadlines, forgotten milestones, and messy spreadsheets cut the motivation, and lead to lower work productivity. Working without a clear project plan will lead your team to a crossroad with no clear action plan. Project management timeline helps to set clear directions and priorities by keeping everyone will be on the same page. Your entire team knows which tasks need to be completed next, as the priorities have been set aside clearly in the first place. Thus, everyone's goals and objectives are likely agreed and aligned together. This implementation plan example illustrates the implementation plan of a SOA software project for an enterprise architecture initiative

Import into your Project

Posts navigation

1 2 3 27 28 29 30 31 32 33 45 46 47