Open post

Simple Merge

Here is a BPMN diagram example that shows the use of the pattern Simple Merge.

  • When several exclusive conditional paths converges on a single activity, which starts when one chosen path completes.
  • XOR-join
  • Is the endpoint of a process split started by an exclusive choice.

The power of patterns in a process becomes clearer when one pattern combines with others to form processes. Simple Merge is one of the many examples of this. Anytime an Exclusive Choice pattern occurs, somewhere downstream in the process there will almost always be a Simple Merge pattern. Simple Merge combines several transitions back into a single activity.

As shown in Example, the "Close Claim" activity merges the transitions coming into it. The insurance claim instance coming into it came from only one of the activities upstream in the process.

Import into your Project
Open post

Exclusive Choice

Here is a BPMN diagram example of the pattern Exclusive Choice.

  • The intent is to branch from a single activity to exactly one of several paths, based on the evaluation of a condition.
  • Known as the XOR-split
  • Widely supported pattern both in BPML, UML, BPEL and BPMN

As shown in the Example, it might be determined that there are two paths that could occur after the Check Credit activity (pass or fail). Depending on the credit score found in the Check Credit activity, the instance either flows to the Check Inventory (passed the credit check) or Notify Customer activity (failed the credit check).

Import into your Project
Open post

Parallel Split

This is a BPMN process diagram example that shows the use of the pattern Parallel Split

  • The intent of this pattern is to branch a single activity to multiple parallel paths.
  • AND-split
  • Used when multiple streams of work need to execute at the same time.

This BPMN example shows the effect of this pattern. If parts of the current “As-Is” process look like a Sequence pattern, evaluate the process to see if it can be improved using a Parallel Split and Synchronization patter.

For example, if the first, second and third activities in a sequence of activities shown in as-is process take 2, 3 and 4 hours respectively, the total time elapsed time to execute all three activities is 9 hours (the sum of the individual activity times).

An improved to-be process might be able to use the Parallel Split pattern to speed up the process. From the example you will find that the 3 tasks may happen simultaneously:
an order can be reviewed (taking 2 hours), while the customer’s credit is being checked (taking 3 hours), while the inventory for the items ordered is being checked (taking 4 hours). Instead of taking 9 hours, the order now takes the 4 hours to complete the three activities (the longest of the three activities in the parallel paths).

Import into your Project
Open post

Sequence

Here is a BPMN business process diagram that shows the use of pattern Sequence.

  • Run activities sequentially
  • For example: Run activity A followed by B, followed C and so on
  • Related to all other patterns

In this example, the customer checkout a shopping cart. After that, he/she confirms the delivery address and then settle payment. These tasks happen one after another.

Import into your Project
Open post

Online Photo Album

This is a ER Diagram example that shows the database design of the Online Photo Album.

Database view is a virtual table that provides the result set of a pre-established query command. This ER Diagram example shows the database design of an online photo album. Besides typical entities like photo, album and member, there is a special shape called <<View>> on the right of the diagram. It is a database view shape developed for the Photo Browsing page. As shown in the database view configuration pane, the database view consists of four columns, extracted from entities Photo and Member. Records are sorted with the (Photo) Title column, and are filtered with their upload dates (> sysdate - 5).

For more details about how to create and edit a database view, please read the ERD user's guide at:

https://circle.visual-paradigm.com/docs/database-design-engineering/database-designers-guide/modeling-database-view/

Import into your Project
Open post

Customer Journey Map Enhancements (14.2 SP1)

This video walks you through the Customer Journey Mapping tool in Visual Paradigm 14.2 Service Pack 1. It focuses on the 14 enhancements, which includes online Customer Journey Mapping tool, persona support, new cells format, etc.

In the next few minutes I will describe and demonstrate the 14 enhancements we have made to our Customer Journey Mapping tool, in Visual Paradigm 14.2, Service Pack 1.

This video will focus on the enhancements. If you want to know what a Customer Journey Map is, please check another video. I’ve included a link in the video description.

Okay, let’s start.


[Customer Journey Mapping Online]

The first and a major enhancement is that you can now develop Customer Journey Maps online.

If you are using Visual Paradigm Professional or Enterprise, you can edit Customer Journey Map under VPository or VP Server.

Let me spend a minute to show you how to start editing a customer journey map online. I’ll start from the subscription of VPository. If you are already using VPository, you can skip the next 20 seconds.

Alright, to try out the online customer journey mapping tool, subscribe to VPository first.

Click the subscribe button here.

Enter your email and confirm.

Wait a minute.

I can now login to VPository.

This is the dashboard of VPository. Simply click here to open the Customer Journey Mapping tool.

The repository is newly created without a project. Let me create one.

I enter the project name. I’m not going add other members right now. This can be done any time in the administration page.

So I just click Create.

I’m brought to the main page of the Customer Journey Mapping tool.

To create a journey map, click on a template. Let’s say I want to start with this standard template, I just click on it.

Give the journey map a name.

And now I can start editing. For example I can rename a stage. Modify the map content, etc.

No matter you are an existing Visual Paradigm user, or totally new to Visual Paradigm, you can try the online Customer Journey Mapping tool by subscribing to VPository. To subscribe, visit www.vpository.com.

Let’s continue to the other enhancements.


[Persona Support]

When you create a new customer journey map, you will see the persona lane here. Let’s see what it is.

Here is a customer journey map, with a persona Ramon Walters.

A persona is a fictional character developed to represent a specific group of customers that share the same goals and customer behaviors. The use of persona allows you to gain a deeper understanding of your customers and to ensure you have your customers in mind when improving customer experience.

This is the photo of the persona, and this is his or her name

You can rename the persona by clicking on the photo.

And enter a description here.

Describe the persona by explaining his background and needs. This will provide background context for the customer journey and help audiences develop empathy for the persona.

You can write a short paragraph here as the description, or a quote for the persona that reflects emotions and attitudes, like this.

“There is nothing I love better than sitting on the sofa, watching TV for the whole day! Blah blah blah”

Make sure it sounds like something a real customer would actually say.


[Chart Support]

Starting from version 14.2 service pack 1 you can represent comparative data through charts.


- Customer experience chart

This is a customer experience chart.

A customer experience chart represents the trend of customer experience across the touchpoints.

In this journey map, we’ve identified 10 touchpoints. The customer experience chart here represents the customer emotion throughout the 10 touchpoints.

You can drag the nodes up and down to update the rating. You can also rename the captions of chart, like this.

To create a customer experience chart, right click on the lane where “consecutive numbers” is selected as cells’ format, and then select Create Experience Chart.


- Emotion chart

This is another journey map. It demonstrates the use of emotion chart.

Emotion charts also represent customer experience. Unlike customer experience chart, emotion chart shows customer experience by stage, not by touchpoints.

The use of smiley faces also make the map more engaging.

You can represent customers’ emotions by dragging the smiley faces up and down.

To create an emotion chart, right click on any lane, and select Insert Lane Above, or Below, and then Emotion.


- Area Chart

This is another journey map with two charts. Let’s take a look at the bottom one first. The area chart.

Area charts allow you to view the overall trend rather than individual values. Besides, an area chart with multiple data series, like this one, allows you to compare the different data under particular stage.


- Cell-based Bar Chart

Finally, you can use bar charts in cells to present categorical data.

In this journey map, we use bar charts to represent the customer’s satisfaction towards different parties.

For example, towards the shop, and the seller.

The configuration of charts in cells can be different. As you can see, the chart under the third stage consists of three bars.

You can adjust the value by drag and drop.

And change the bars to appear in the chart configuration screen, like this.

To create an area chart is simple. Just right click on any lane’s header and select Insert Lane Above or Below, and then Area Chart


[More Cell Formats]

We’ve also enriched the journey map by supporting few more cells format.


- Consecutive numbers

The first one, consecutive numbers.

You can apply consecutive numbers for cell items. Consecutive means the items will be numbered in order and the count will not reset in a new stage.

In this map, consecutive numbers are used to represent the 10 touchpoints.


- Use Image in cells

If you want to represent a customer journey with images, you can set the images as cells’ background.

In this journey map, we used 3 cartoon images to visualize the customer journey of an on-site oven repair service.

To use image in a cell, right click on the cell and select Set Background Image


- Description Cell

The next one, description cell.

Besides listing information point by point, you can also write description for the entire cell.


- Merge Cells in Lane

Finally, you can merge all the cells in a lane to become one, like this.


[Other Enhancements]

Let’s take a look at the other enhancements.


- Temporarily Hide Away a Lane

There may be different audiences for your journey map who are interested in different parts of a customer journey. You can show them the information they interested in by hiding away irrelevant lanes in the map.

To hide away a lane, just right click on its header and select Hide from the popup menu.

To show a hidden lane, right click on the background of the map and select Show Lanes, and then the lane to set visible.


- Stage Description

Now, you can write a short description for stages, like this one.


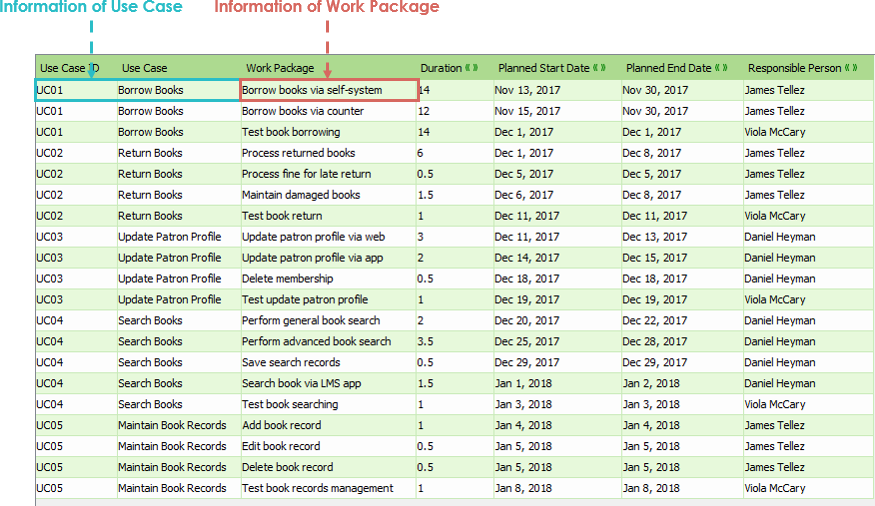
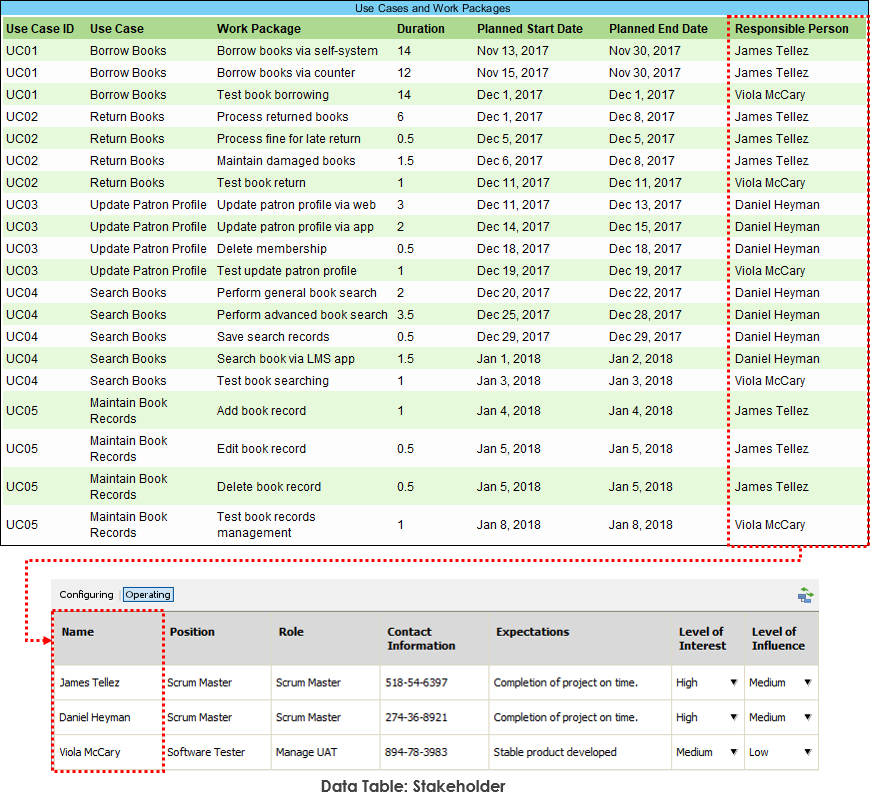
- Stakeholder Assignment

You can set to cells the stakeholders who are responsible for changes planned. To do this, right click on the cell and select Set Stakeholders.


Move Lanes Up-and-Down

Finally, you can now re-order lanes easily with drag-and drop.


That’s all for the enhancements of customer journey mapping, available in Visual Paradigm 14.2 service pack 1.

We hope you find the changes useful. If you are using version 14.2, you can update your installation to advance to service pack 1. No re-activation required. If you want to try the online customer journey map, you can subscribe to VPository at www.vpository.com

Thank you for watching this video. Good bye.

Open post

On-Demand Model ETL Example – Library Management System

On-Demand Model ETL is a set of concepts and tools that group together to support an agile utilization of model data. As an integral part of On-Demand Model ETL, the ETL Table provides a smart table for agile model editing. An ETL Table lists a selected set of model elements and properties as rows and columns. Besides those ordinary properties that came along with the specification, you can attach your own properties based on your needs. You can also present second level model data in one row. Let’s go through this ETL Table example and see how ETL Table can be utilized.

The Library Management System example – At a glance

The objective of this example is to identify the major development tasks of a Library Management System project and their inter-dependencies. The example involves the steps below:

  1. Identify the use cases of the Library Management System through use case modeling
  2. Produce a Work Breakdown Structure from the use case model. The use cases are transformed as the “backbone” of a Work Breakdown Structure
  3. Break the works down into smaller work packages.
  4. Schedule the works by means of an ETL Table (The focus on this example!)
  5. Produce a PERT Chart from the Work Breakdown Structure. The work packages are transformed as tasks in PERT Chart.
  6. Connect the tasks in PERT Chart to present their inter-dependencies

Detailed walk-through

Let’s take a closer look at this example. We will also explain the use of ETL Table in this section.

In order to fully understand this example, you are suggested to import this example into Visual Paradigm first.

Let’s start!

We’ve drawn a use case diagram Library Management System Use Case Model for modeling the use cases of the system. The system involves use cases like Borrow Books, Return Books, Update Patron Profile, Search Books and Maintain Book Records.

Visual Paradigm - Use Case Library Management System

The use case diagram was then transformed into a Work Breakdown Structure diagram “LMS Work Packages” through Baggage Transformation. Initially, the breakdown structure diagram has a root element and five children elements, which correspond to the five use cases modeled in the use case diagram. We broke down the 5 elements into work packages. Each represents a unique piece of project activity that has a distinct objective, outcome and is measurable.

We then created an ETL Table for this work breakdown structure. Below the work breakdown structure you can see a table of work packages. That’s an ETL shape, which is the visual representation of the ETL Table. Let’s open it. Right click on it and select Open Use Cases and Work Packages.

The table is empty initially. We configured it to make it lists the elements of a Work Breakdown Structure.

We also applied three conditions (is) to restrict the table to list only the work packages but not the root element nor the backbone elements.

Each row in the ETL Table refers to a work package in the diagram. Besides the information of the work package itself, it also consists of the ID and name of the use case in which the work package belongs to.

The last four columns – Duration, Planned Start Date, Planned End Date and Responsible Person are what we called Aspect-Oriented Properties that are user-defined properties ‘plugged’ into this table on-demand. The properties are defined for task scheduling purposes. We can easily attach and de-tach such properties by applying and removing an ‘aspect’ to an ETL Table.

We’ve fill-in the table by entering the duration, planned start and end date and selecting the responsible person for work packages.

By the way, the Responsible Persons are managed under a Data Table ‘Stakeholder’, which is a special kind of diagram that can be opened from Project Browser.

By entering the stakeholders, you can select them in ETL Tables.

Next, we transformed the work breakdown structure diagram into a PERT Chart with the use of Baggage Transformation.

The work packages become tasks in PERT Chart, while the start and end date, and the responsible person are converted from the Aspect-Oriented Properties accordingly.

The final step is to connect the tasks to represent their dependencies.

Import into your Project

Posted by:

Open post

What is a Radar Chart

Here is a Radar Chart example.

A Radar Chart is a graphical method of displaying multivariate data in the form of a two-dimensional chart of three or more quantitative variables represented on axes starting from the same point.

Example: Beer Comparison

Each of the 8 aspects of beer form individual axes which have been arranged, the value of each aspect is depicted by the node on the axis. A line is drawn connecting the data values for each axis.

Import into your Project

Posted by:

Posts navigation

1 2 3 4 5 6 7 8 9 45 46 47