Visual Paradigm supports mapping object model (class diagram) with data model (Entity Relationship Diagram). Such mapping enables the production of programming source code from object model, which can be used in developing applications that require accessing database.
In order for the application to work properly, it is important that the object model and data model are conformed with each other. In Visual Paradigm, you can make them conformed by synchronizing them manually.
Synchronize object model to data model
To synchronize object model to data model, perform the steps below.
- Select Tools > Hibernate > Synchronize to Entity Relationship Diagram from the toolbar.
- One class diagram maps with one ERD. If any of your class diagram has not been mapped with an ERD, you will be prompted to select the ERD to map with. Upon finishing, entities will be visualized in the ERD selected, following the corresponding class diagram. You can select an existing ERD from the drop down menu, or enter a new diagram name to create a new ERD.
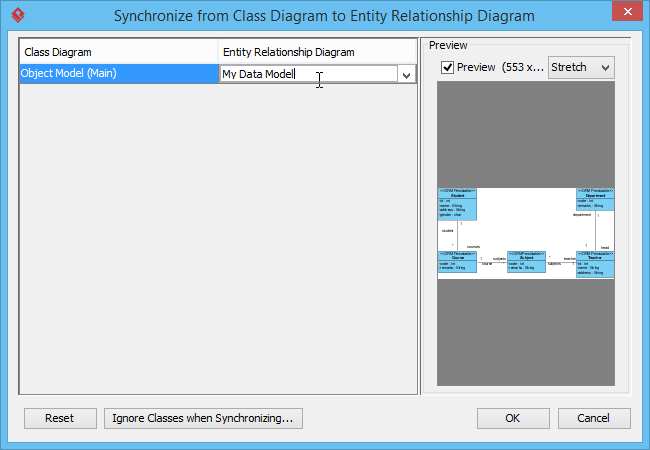
- Click OK.
- This shows the Synchronize to Entity Relationship Diagram. There are primarily four actions you can/have to do in this window, as described in the table below.
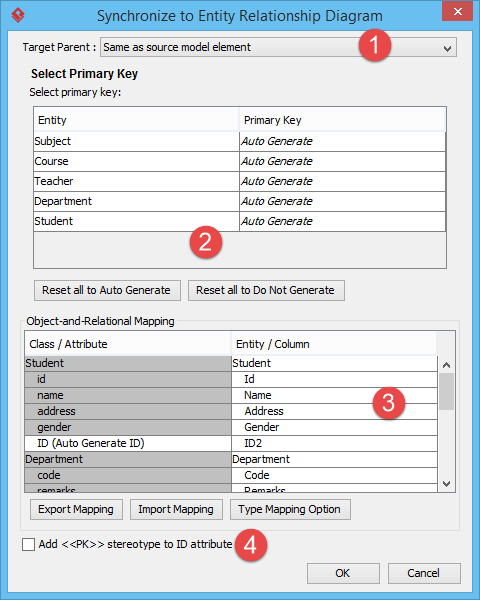
No. Name Description 1 Target Parent Click on the drop down menu to specify the placement of entities to be created, if any.
Root – Place the new entities directly under project root.
Same as source model element – Place the new entities to the same parents as the corresponding classes.
Specify – Choose a model to place the entities yourself.2 Select Primary Key Select primary keys for entities without primary keys specified yet. You can choose a column of an entity as its primary key, or select Auto Generate to let Visual Paradigm generate a new primary key column for you, namely ID, or select Do Not Generate to leave the entity without primary. 3 Object-and-Relational Mapping Confirm the naming for new entities and/or columns. By default, the entities and columns will be named following the corresponding classes and attributes. If you want different names you can double click on the corresponding cells and enter yourself. You can also select the column type to map to for string, boolean and byte[] attributes, by clicking Type Mapping Option and choosing the target types in the popup dialog box.
Besides, you can export the mapping as an Excel file by clicking Export Mapping, and then edit the mapping externally and import it back by clicking Import Mapping.
4 Add <<PK>> stereotype to ID attribute In ERD, primary keys are represented with a key icon, but in class diagram, there is no indication for attributes that map to a primary key column. If this information is important to you, you can check this option to let us stereotype attributes that map to primary keys as <<PK>>. The stereotype will be visualized in diagram so that you can differentiate such attributes from other attributes. - Click OK. Your object model is now synchronized to data model. Click here if you want to learn more about the detailed mapping from object model to data model.
Synchronize data model to object model
To synchronize data model to object model, perform the steps below.
- Select Tools > Hibernate > Synchronize to Class Diagram from the toolbar.
- One ERD maps with one class diagram. If any of your ERD has not been mapped with a class diagram, you will be prompted to select the class diagram to map with. Upon finishing, classes will be visualized in the class diagram selected, following the corresponding ERD. You can select an existing class diagram from the drop down menu, or enter a new diagram name to create a new class diagram.
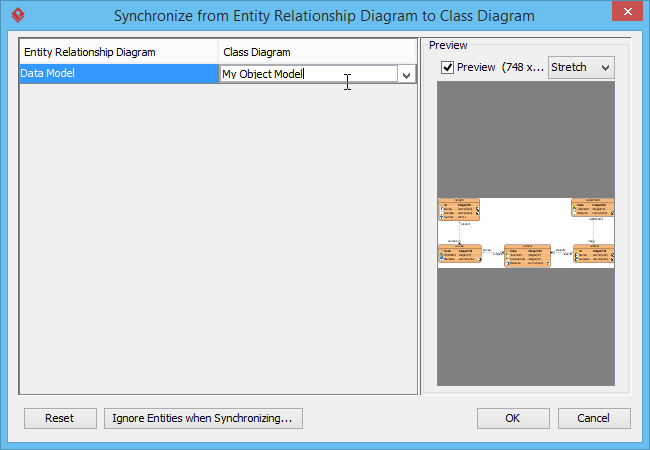
- Click OK.
- This shows the Synchronize to Class Diagram. There are primarily three actions you can/have to do in this window, as described in the table below.
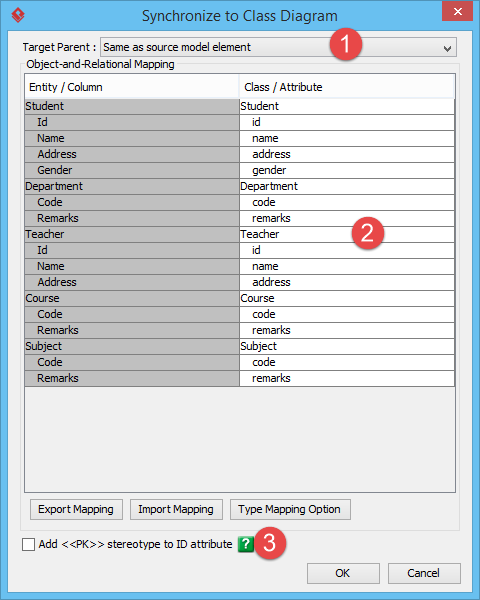
No. Name Description 1 Target Parent Click on the drop down menu to specify the placement of classes to be created, if any.
Root – Place the new classes directly under project root.
Same as source model element – Place the new classes to the same parents as the corresponding entities.
Specify – Choose a model to place the classes yourself.3 Object-and-Relational Mapping Confirm the naming for new classes and/or attributes. By default, the classes and attributes will be named following the corresponding entities and columns. If you want different names you can double click on the corresponding cells and enter yourself. You can also select the attribute type to map to for columns in decimal and numeric types by clicking Type Mapping Option and choosing the target type in the popup dialog box.
Besides, you can export the mapping as an Excel file by clicking Export Mapping, and then edit the mapping externally and import it back by clicking Import Mapping.
4 Add <<PK>> stereotype to ID attribute In ERD, primary keys are represented with a key icon, but in class diagram, there is no indication for attributes that map to a primary key column. If this information is important to you, you can check this option to let us stereotype attributes that map to primary keys as <<PK>>. The stereotype will be visualized in diagram so that you can differentiate such attributes from other attributes. - Click OK. Your data model is now synchronized to object model. Click here if you want to learn more about the detailed mapping from data model to object model.