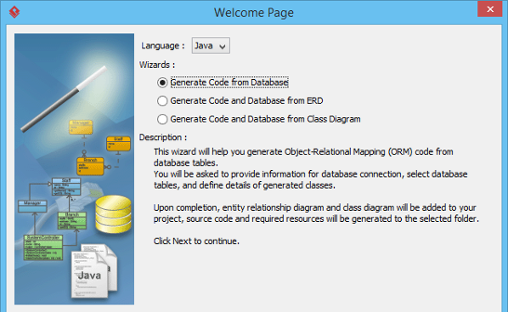
If you have to build a system that needs to communicate with an existing database, you can make use of the wizard in Visual Paradigm to generate ORM tier directly from the database, and then program your database access tier by using the generated ORM code and library. Besides ORM code, the wizard will also generate the class diagram and ERD, which correspond to the object model and the database design, providing you with a reference to follow when in coding.
Generating ORM code from database
- Select Tools > Hibernate > Wizards… from the toolbar. This opens the Wizard window.
- Set the (Programming) language of your project in the Language field.
- Keep Generate Code from Database selected and click Next.
- In the Database Setting page, select the Driver. A driver is a software component essential for us to connect to your database. There are different driver suppliers on the market. Choose the one you like.
- Provide the Driver field. JDBC is a popular option in database connectivity. We use JDBC in connecting with database. In order for the wizard to read your database, you have to specify the JDBC driver here. It can be downloaded automatically by clicking
 . If it failed to find one, you will be redirected to the download URL.

- Enter the Database name. ORM code will be generated for this database. Alternatively, you can click on the radio button below database name to enter a connection URL manually.
- Enter the username of the user who has the access right to the database, and his/her password.
- You can set the settings as default by selecting Set as default to avoid entering the connection settings the next time you perform ORM code generation.

- Click Test Connection to ensure the settings entered are valid and Visual Paradigm can connect to your database without problem.
- Click Next.
- In the Selecting Tables page, decide which table to be included in code generation. All tables in the specified database are selected by default. You may optionally remove any tables from the selected list by selecting them and clicking <.

- Click Next.
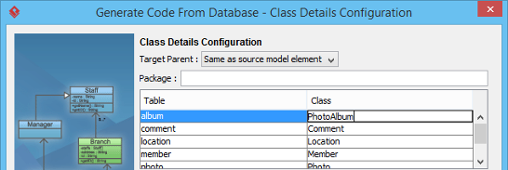
- The mapping between table and generated code can be specified in the Class Details Configuration page. The wizard will generate not just ORM code but also class diagram and ERD. You can select the target parent (model) for storing the created model data.
- You can optionally provide a package name. A package will be created to store the generated ORM code. If package name is not specified, the classes generated will have not be in any package.
- The name of classes will follow the name of tables by default. You can edit the class names by double clicking on the related cell and entering a new name.
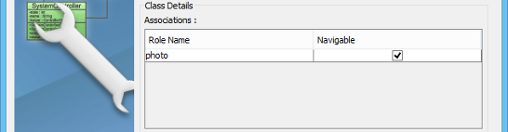
- You may also rename the role name and edit the navigability between classes. If you de-select navigable, the reference to the target role will not be created. Use with care.
- You may also edit the attribute names.
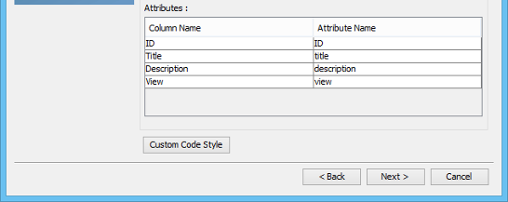
- You may customize the generated code by applying prefix and suffix to class and attribute names. For details, read the next section.
- Click Next.
- You can now specify the code details.
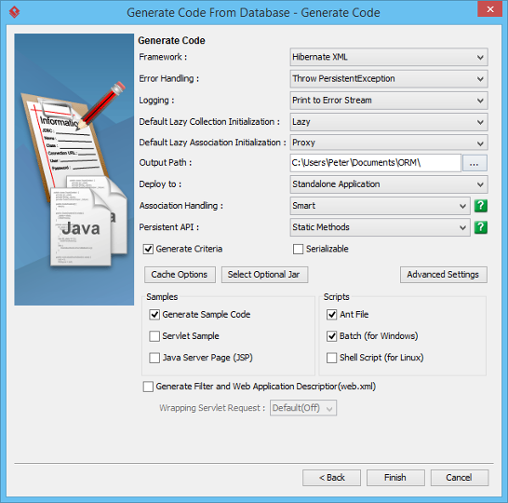
Option Description Framework Select between Hibernate XML or JPA. Error Handling - Return false/null – It returns false/null in the method to terminate its execution
- Throw PersistentExpcetion – It throws a PersistentException which will be handled by the caller
- Throw RuntimeException – It throws a RuntimeException which will be handled by the caller
- Throw User Defined Exception – Choose this option to manually specify an exception class
Logging Select how to log exceptions, either do not show, print to error stream or print to log4j. Default Lazy Collection Initialization Lazy initialization avoids objects in collection from being loaded unnecessarily when the main object is being loaded. Default Lazy Association Initialization Lazy initialization avoids associated objects from being loaded unnecessarily when the main object is being loaded. Output Path The location to store the generated persistent code source files. Deploy to Select the type of application that you want to deploy to. Association Handling Select the type of association handling to be used, either Smart or Standard. - Smart – When you update on end of a bi-directional association, the generated persistent code is able to update the other end automatically. Besides, you do not need to cast the retrieved object(s) into its corresponding persistence class when retrieving object(s) from the collection.
- Standard – You must update both ends of a bi-directional association manually to maintain the consistency of association. Besides, casting of object(s) to its corresponding persistence class is required when retrieving object(s) from the collection.
Persistent API Select the type of persistent code to be generated, either Static Methods, Factor Class, DAO, POJO or Mapping Only. Generate Criteria Check this option to generate the criteria class for each ORM-Persistable class. The criteria class supports querying the database by specifying the searching criteria. Serializable Cache Options Click to choose a cache option. Select Optional Jar Click on the Select Optional Jar button, then select the libraries and JDBC driver to be included in the generation of the orm.jar file. Advanced Settings Click to specify the advanced settings. Samples Samples files, including Java application, servlet, servlet filter and Java Server Page (JSP) sample are available for generation. The generated sample files guide you through the usage of the Java persistence class. You can check the options to generate the sample files for reference. Scripts Check the options to generate the scripts, including Ant File, Batch and Shell Script which allow you to execute the scripts directly. Generate Filter and Web Application Descriptor (web.xml) Check this option to generate filter and web application description, which are useful in web application development. - Click Finish to start code generation. The Generate ORM Code/Database dialog box will appear, indicating the progress of code generation. Click Close when complete.
- A class diagram and an ERD will be generated automatically and be added to your project. The generated persistent code and required resources will be generated to the specified output path.
Custom Code Style
In wizard, there is an option for you to customize the generated code by applying prefix and suffix to class and attribute names. By clicking Custom Code Style in the Class Details Configuration page, you will see the following window.
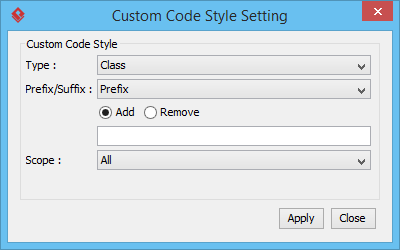
The description of fields are as below.
| Field | Description |
|---|---|
| Type | Select the type of class details, either Class, Attribute or Role Name (PK) that you want to apply code style. |
| Prefix/Suffix | Select either prefix or suffix to be added or removed. |
| Add/Remove | Enter the word for either prefix or suffix |
| Scope | Select the scope of the code style to be applied to, either All or Selected |
The following table shows the result of applying code styles.
| Code Style | Before Applying | After Applying |
|---|---|---|
| Add Prefix (e.g. pre_) | Item | pre_Item |
| Remove Prefix (e.g. pref_) | pre_Item | Item |
| Add Suffix (e.g. _suf) | Item | Item_sif |
| Remove (e.g. _suf) | Item_suf | Item |