Instant Generator is the process of producing source code from UML class model. Designers or software architects can build a high level domain class model, then pass to programmer to perform more lower-level system or application modeling and eventually generate source code from implementation model. This chain makes building software faster and cheaper. In this chapter, we will go through the instant generation of VB.NET. To generate code by instant generator:
- Select Tools > Code > Instant Generator from the toolbar.
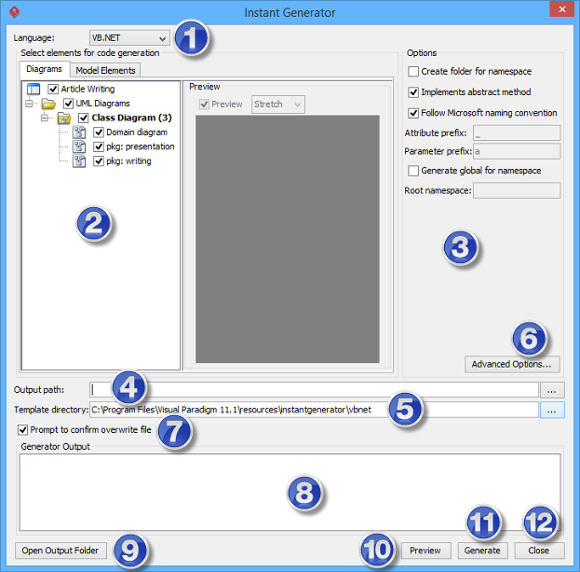
- In the Instant Generator window, select VB.NET as the Language.
- Fill in the Output Path, which is the directory where you want the code to generate to.
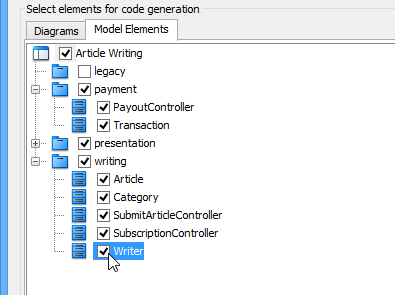
- Select the classes to generate code. In the Diagrams tab, you can select the diagrams to generate code for classes in the selected diagrams. Alternatively, open the Model Elements tab and select the classes to generate code.

- Optionally configure the generator options. Read the section below for a description of options.
- Click Generate to generate code.
Overview of Instant Generator

| No. | Name | Description |
|---|---|---|
| 1 | Language | The programming language to generate. |
| 2 | Model element tree | A list of packages and classes that can be selected for code generation. You must select classes for code generation. |
| 3 | General options | Some of the common configurable options are shown here. You can configure them in advanced options. |
| 4 | Output path | The folder where you want the code files to be generated. |
| 5 | Template directory | Template governs how code will be generated from model to code. You can customize the template to suit your needs, such as to print company specific headers to each code file. If you want to use your own template, provide the template directory here. If you want to keep using the build in template, leave this option unchanged to let Visual Paradigm generate with build in template. To learn more about customization, read the final chapter of this part. |
| 6 | Advanced options | Click this button to configure any options related to code generation in a new window. |
| 7 | Prompt to confirm overwrite file | If a code file instant generator going to generate is already exist, by checking this option you will be asked whether to overwrite that file or not. If you uncheck this option, it will help you to overwrite the existing file automatically. |
| 8 | Output pane | Any warning, error or progress about generation will be printed here. |
| 9 | Open output folder | Open the output path with system browser. |
| 10 | Preview | Click to preview the code content. It is just a preview and code will not be generated to the output path by previewing. |
| 11 | Generate | Click to start generation. |
| 12 | Close | Click to close the instant generator. |
Generator options
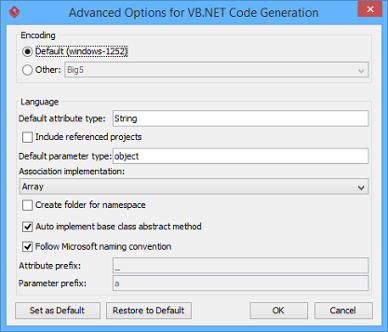
On the Instant Generator window you can configure some of the common code options at the right of window. You can also configure the advanced options for more detailed settings by clicking the Advanced Options… button.

Below is a description of available options.
| Option | Description |
|---|---|
| Encoding | The encoding of source file. |
| Default attribute type | Attribute type that will be used when attribute has no type specified. |
| Allow From Linked Project | Check to generate also classes in referenced project. |
| Default parameter type | Parameter type that will be used when parameter has no type specified. |
| Association implementation | The type of collection to be used for association. |
| Create folder for namespace | Create a directory in system for namespace |
| Auto implement base class abstract method | Whether or not to generate operations for implementing abstract operations defined in super class. |
| Follow Microsoft naming convention | Make the code convention follow Microsoft |
| Attribute prefix | The text to append to attribute name as prefix. |
| Parameter prefix | The text to append to parameter name as prefix. |