You can design your REST API by drawing a class diagram that represents your resource, the request and response body.
Drawing REST Resource
A REST resource is the fundamental unit of a web service that conforms to REST. It is an object with a URI, the http request method, associated parameters and the request/response body. Each of the REST resources represents a specific service available on the path specified by its URI property. Therefore, if you want to model multiple services, please draw multiple REST resources.
To draw a REST resource:
- Select Diagram > New from the application toolbar. In the New Diagram window, select Class Diagram and the click Next. Enter the diagram name and description and then click OK.
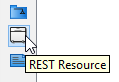
- Select REST Resource in the diagram toolbar.
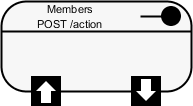
- Click on the diagram to create a REST Resource. Name the resource by giving it a short and meaningful name.
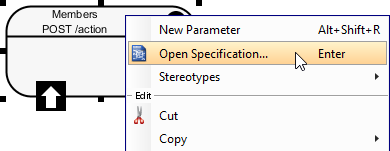
- Right click on the REST Resource and select Open Specification… from the popup menu.
- In the General tab, fill in the following:
Property Description URI Each REST Resource has its own URI. Consumers access to URL to access for the REST Resource. Typically, a RESTful URI should refer to a resource that is a thing instead of referring to an action. Therefore, when you are deciding the URI, try to use a noun instead of a verb.
Method Specifies the action to act on the resource. For details, please read the section Methods (HTTP methods) below. Description Description of resource that will appear in generated API documentation. It is recommended to provide clear description of the service, so that the consumer know what the service is and how to operate with it. 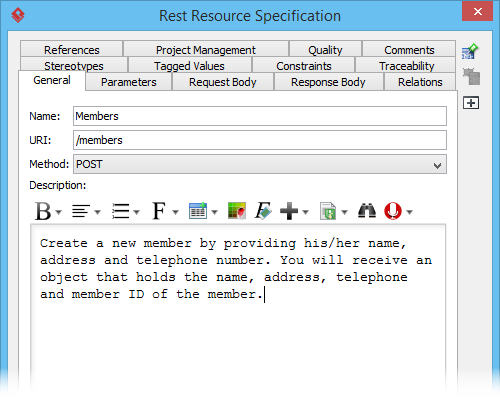
- Click OK to confirm the changes.
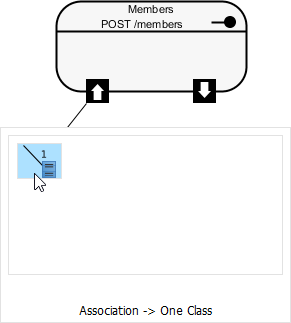
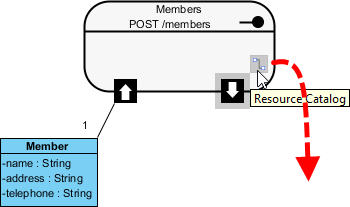
- If the REST Resource uses a POST, PUT, PATCH or DELETE method and if parameter is required in using the REST Resource, model the parameters by drawing class(es). Move your mouse pointer over the REST Request Body icon. Press on the Resource Catalog button and drag it out.
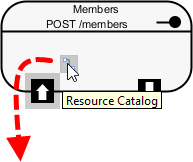
Create class from REST Request Body - Release the mouse button and select Association -> One Class from Resource Catalog.
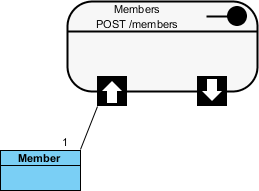
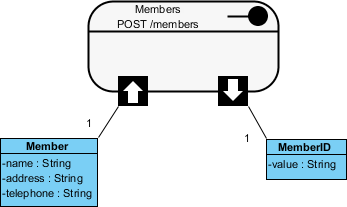
- Release the mouse button to create the Request class. The class is named based on the REST Resource by default. You can rename it if you like. For instance, if you are going to create a member via the /members REST Resource, you probably need to send the member’s details to the server for creating a member record. Therefore, name the class Member for storing member’s details.
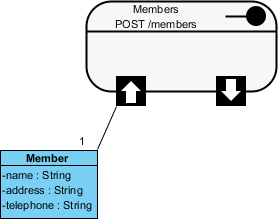
- Add the attributes into the classes. These attributes will hold the data that sends to the server.
Here is a comparison between the class model and the representation of request body in JSON.
Note that you are free to create a more complex structure by creating more associated classes, but normally you don’t need to do this. - Now, you can move on to designing the response part of the REST Resource. Move your mouse pointer over the REST Request Body icon. If the service will return a simple data value or object, press on the Resource Catalog button and drag it out. Then, select Association -> One Class from Resource Catalog. If the service will return an array of object, select Association -> Many Class from Resource Catalog.
- Name the class and add the attribute into the class.
Here is a comparison between the class model and the representation of response body in JSON.
Specifying parameters for REST Resource that uses GET
Parameters are referring to query parameters used for passing data to a service. For example, when you use a ‘currency converter’ service, you probably need to pass the amount to convert, the current currency and the target currency to the service, in return for the converted amount. The amount to convert, the current and target currency are therefore the parameters of service.
A feature of parameters is that they are optional. Another character of parameters is that they are non-unique, which means that you can add the same parameter multiple times.
Parameters are appended to the path of a URL when submitting a HTTP request. A URL with parameters could look like this:
http://www.example.com?age-limit=18
To add parameters to a REST Resource:
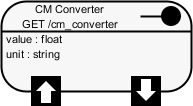
- Right click on the REST Resource and select New Parameter from the popup menu.
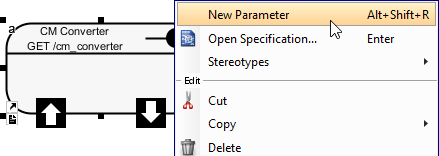
- Enter the name of the parameter. If you like, you can specify the type as well. Note that the specification of type is just for documentation purpose. While it helps the consumer to understand what kind of data is expected, it won’t have any effect in code level. In coding, parameters are always put into a Map that takes string as both key and value.
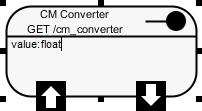
- Press Enter.
- Repeat step 2 and 3 to create all parameters. Press Esc when finished creating all parameters.
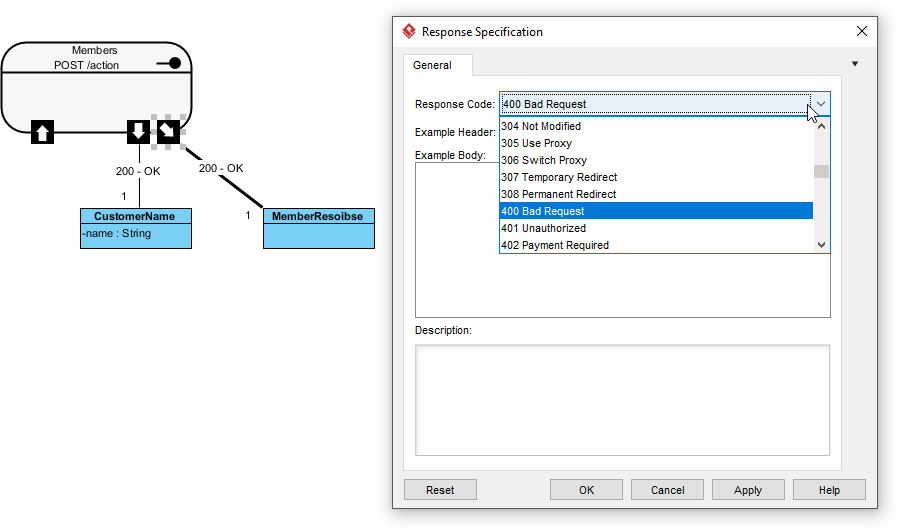
Modeling multiple scenarios
Sometimes, you may need to model multiple scenarios where there could be multiple or different Response Bodies. For example, you want to define the various HTTP status codes that can be returned as well as in some cases you may be returning an Error object embedded within the main response object. For example:
Case 1:
Response Header:
status : 200 OK
Response Body:
{
“customer” : {
“name” : “Peter”,
}
}
Case 2:
Response Header:
status : 400 Bad Request
Response Body:
{
“customer”: {
“error” : {
“text” : “Invalid customer name.”
}
}
To represent this, create multiple Response Bodies from the REST Resource. To set a response code, right click on the Response shape and select Open Specification… from the popup menu. Edit the Response Code in the Response Specification.
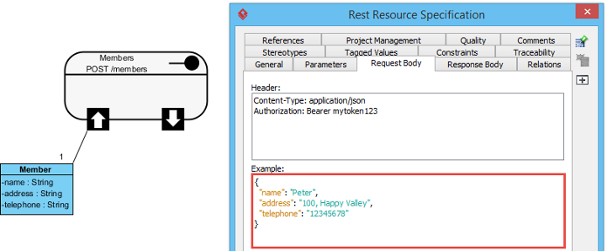
Specifying the Request Header and Request Example
A HTTP message consists of a HTTP request line, a collection of header fields and an optional body. In order for consumers to access a REST Resource, you have to specify the request headers and request (body) example. By doing so, the request header and example will be presented in the generated API documentation. Consumer can then follow the specification in using the service.
- Right click on the REST Resource and select Open Specification… from the popup menu.
- Open the Request Body tab.
- Enter the Header. As we said in the Overview of REST API page that REST is not a standard but architectural style. REST makes use of HTTP standard, so, any REST call header is in fact HTTP header. For more details about headers, read the Headers (HTTP headers) section below.
- Enter the Example in JSON.
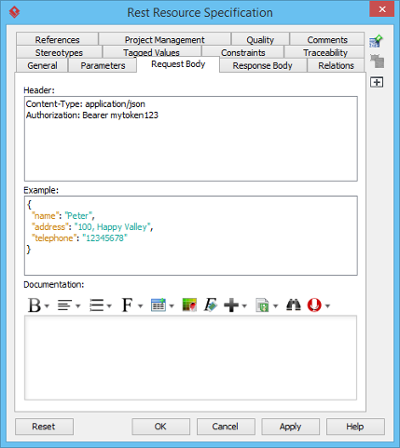
- Click OK to confirm the changes.
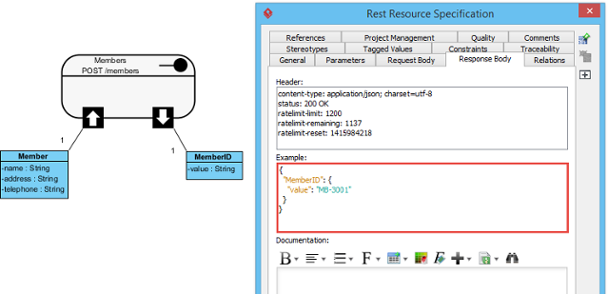
Specifying the Response Header and Request Example
A HTTP message consists of a HTTP request line, a collection of header fields and an optional body. In order for consumers to access a REST Resource, you have to specify the response headers and response (body) example. By doing so, the response header and example will be presented in the generated API documentation. Consumer can then follow the specification in using the service.
- Right click on the REST Resource and select Open Specification… from the popup menu.
- Open the Response Body tab.
- Enter the Header. As we said in the Overview of REST API page that REST is not a standard but architectural style. REST makes use of HTTP standard, so any REST call header is in fact HTTP header. For more details about headers, read the Headers (HTTP headers) section below.
- Enter the Example in JSON.

- Click OK to confirm the changes.
Headers (HTTP headers)
HTTP headers are the core component of any HTTP requests and responses, and they define the operating parameters of any HTTP transactions. When you visit a URL in your web browser, your web browser sends an HTTP request and it may look like this:
GET / HTTP/1.1 Host: www.visual-paradigm.com User-Agent: Mozilla/5.0 (Windows NT 6.3; WOW64; rv:33.0) Gecko/20100101 Firefox/33.0 Accept: text/html,application/xhtml+xml,application/xml;q=0.9,*/*;q=0.8 Accept-Language: en-US,en;q=0.5 Accept-Encoding: gzip, deflate Cookie: landing=b7b93a316f374b13af4d5904c9797dcc; __utma=... Connection: keep-alive Pragma: no-cache Cache-Control: no-cache |
After the request, your web browser receives an HTTP response and the HTML content to be displayed.
As we said in Introducing REST API design and generation that REST is not a standard but architectural style. REST makes use of HTTP standard. Therefore, any REST call headers are in fact HTTP headers.
Methods (HTTP methods)
HTTP methods, or sometimes known as HTTP verbs, specify the action to act on a resource. The most commonly used HTTP methods are GET, PUT, POST and DELETE, which correspond to read, update, create and delete operations, respectively.
| Method | Description |
|---|---|
| GET | A GET method (or GET request) is used to retrieve a representation of a resource. It should be used SOLELY for retrieving data and should not alter. |
| PUT | A PUT method (or PUT request) is used to update a resource. For instance, if you know that a blog post resides at http://www.example.com/blogs/123, you can update this specific post by using the PUT method to put a new resource representation of the post. |
| POST | A POST method (or POST request) is used to create a resource. For instance, when you want to add a new blog post but have no idea where to store it, you can use the POST method to post it to a URL and let the server decide the URL. |
| PATCH | A PATCH method (or PATCH request) is used to modify a resource. It contains the changes to the resource, instead of the complete resource. |
| DELETE | A DELETE method (or DELETE request) is used to delete a resource identified by a URI. |