Instant Reverse is a process to produce UML class model from a given input of source code. With instant reverse, you can reverse a snap shot of your code-base to UML classes and form class diagram in further. By bringing code content into visual UML model, this helps programmers or software engineers to review an implementation, identify potential bugs or deficiency and look for possible improvements. Apart from this, developers may reverse a code library as UML classes and construct model with them, like to reverse a generic collection framework and develop your own framework by extending the generic one. In this chapter, we will go through the instant reverse of Objective-C.
Reverse engineering UML classes from source files
- Select Tools > Code > Instant Reverse… from the toolbar.
- In the Instant Reverse window, select Objective-C as the Language.
- Specify the path of the source file or the folder that contains those files.

- You can place reversed classes to specific model. For example, to place legacy code to a model named Old, to place system prototype to a model named Prototype and so forth. To do this:
- Click on the … button at the end of the Reverse to Model row.
- In the Select Parent Model window, either select an existing model, or create one by clicking New Model.
- Click OK to confirm.
- Click OK to start reversing.
- Upon finishing, you will see the Instant Reverse Form Diagram window appear. If you want to form a class diagram with the reversed classes, select the classes to form diagram, configure the options and click OK to proceed. Read the next section for detail. If you do not want to form diagram now, click Cancel to exit.Note: By cancelling from forming diagram, it just means you do not want to form diagram with the reversed classes for the time being. You can still look for the classes in Model Explorer or Class Repository, and possibly form diagram later on manually.
Overview of Instant Reverse
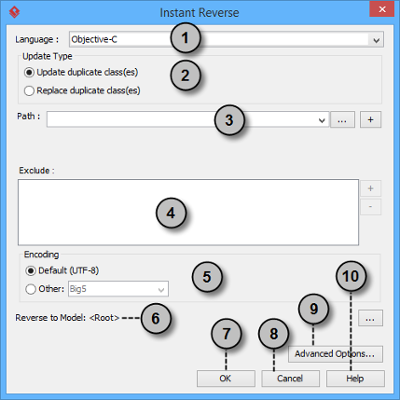
| No. | Name | Description |
|---|---|---|
| 1 | Language | The language of source to reverse. |
| 2 | Update type | Determine how to handle duplicated classes by selecting the Update Type. Below is a description of the update types:
Update duplicate class(es) – Update existing class(es) by source. Replace duplicate class(es) – Discard existing class(es), overwrite by reversed source. |
| 3 | Path | The path of source to reverse. |
| 4 | Exclude | The file(s) to exclude when reverse. |
| 5 | Encoding | The encoding of source files. |
| 6 | Reverse to model | Place reversed classes to specific model. For example, to place legacy code to a model named Old, to place system prototype to a model named Prototype and so forth. |
| 7 | OK | Click to start reversing. |
| 8 | Cancel | Click to close instant reverse. |
| 9 | Advanced Options | More configurable options related to Objective-C instant reverse. |
| 7 | Help | Click to read the Help contents. |
Forming class diagram from reversed classes
By the end of an instant reverse operation, you will be asked whether or not to form a class diagram with reversed UML classes. By selecting classes and configuring the way to present them and confirm, a diagram will then be formed.
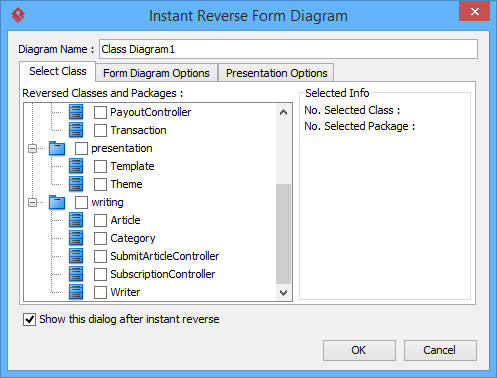
Note: If you do not want Visual Paradigm to ask you for forming diagram next time you perform instant reverse, uncheck Show this window after instant reverse.
Below is a description of this window, base on the tabs.
Select Class
The classes listing in the tree are those reversed from your code-base. You must select at least one class in order to form a class diagram. Notice that forming diagram can be a costly operation if you have selected too many classes in forming diagram.
Form Diagram Options
| Option | Description |
|---|---|
| Show superclasses | Show the generalization relationships between the selected elements and their super classes (ancestors) in the new diagram. |
| Show subclasses | Show the generalization relationships between the selected elements and their subclasses (descendants) in the new diagram. |
| Show suppliers (interface) | Show the realization relationships between the selected elements and their suppliers (interfaces) in the new diagram. |
| Show clients | Show the realization relationships between the selected elements and their clients (classes that implements them) in the new diagram. |
| Show navigable classes | Show the association relationships between the selected elements and their navigable classes (targets) in new diagram. |
| Show non-navigable classes | Show the association relationships between the selected elements and their non-navigable classes (sources) in the new diagram. |
| Show containers | Show the containment relationships between the selected elements and their containers (e.g. packages) in the new diagram. |
| Show residents | Show the containment relationships between the selected elements and their containers (e.g. packages) in the new diagram.
Single level only – Show one level residents only in the new diagram. All levels in single diagram – Show all level residents in the new diagram. All levels in sub diagrams – Show all level residents in the new diagrams (multiple single level diagrams). |
| Show as containment relationships | Show the containment relationships as connectors in the new diagram.
Notes: The containment relationships between classes are shown as connectors. |
Presentation Options
| Option | Description |
|---|---|
| Attribute options | Show all – Show all attributes of classes in the new diagram.
Public only – Show all public attributes of classes only in the new diagram. Hide all – Hide all attributes of classes in the new diagram. Initial values – Show initial values of attributes of classes in the new diagram. |
| Operation options | Show all – Show all operations of classes in the new diagram.
Public only – Show all public operations of classes only in the new diagram. Hide all – Hide all operations of classes in the new diagram. Initial values – Show initial values of operations of classes in the new diagram. |
| Type options | Fully-qualified – Show fully-qualified name of types.
Name only – Show name of types. Relative – Show name of types relative to this class. |