By animating a business process diagram, you can see the flow of tasks within a process, from the beginning until the end. This does not only help to understand a process but also trace the bottleneck and look for improvements.
Creating an animation
- Select Modeling > Animation from the toolbar.
- Click Create New Animation at the top left of the Animation Panel.

- Give a meaningful name to the animation based on the flow you want to animate. Press Enter to confirm.

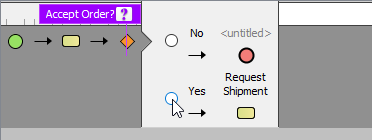
- When you add an animation for a process that involves gateway, you need to select the outgoing flows for gateway(s) in order to complete the path. To resolve an exclusive gateway requires the selection of the outgoing path. To resolve an inclusive gateway requires the selection of zero to multiple outgoint paths. Make your selection and click the green arrow button to confirm.
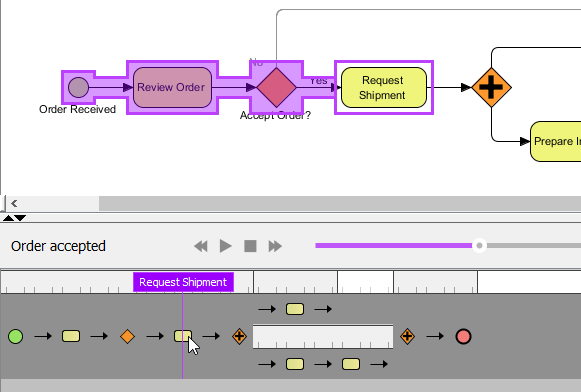
 The path of the animation is determined automatically by evaluating the flow modeled in the diagram. Shapes that form the path are shown in the Animation Panel as icons. If you click on any of them, it will jump right to the corresponding model element in the diagram.

Overview of Animation Panel
This Animation Panel is where you can control the animation.

| No. | Name | Description |
|---|---|---|
| 1 | Expand/Collapse | Expand or collapse Animation Panel |
| 2 | Name | The name of the current flow. |
| 3 | Backward | Move one shape backward in the flow. |
| 4 | Play | Play or continue to play the animation with Animation minimized. |
| 5 | Stop | Terminate the animation. |
| 6 | Forward | Advance to the next shape in the flow. |
| 7 | Slider | It is used for controlling the flow of animation. |
| 8 | Add Animation | Create a new animation. |
| 9 | Refresh | It is used for re-identifying the flow of animations base on the diagram content. |
| 10 | Options | Click to configure Animation. |
| 11 | Export | Export animation to HTML5. |
| 12 | Settings | Click to rename or delete the flow. |
| 13 | Close | Click to close the Animation Panel. |
| 14 | Flow of shapes | It displays all shapes of the current animation. Pressing on a shape here will highlight the corresponding shape in diagram. |
| 15 | Shape name | The name of the selected or animating shape. A question mark indicates that the shape is a decision shape. You can click on the question mark to re-select its outgoing flow. |
| 16 | Parallel flow | Parallel flow is presented as a branch. |
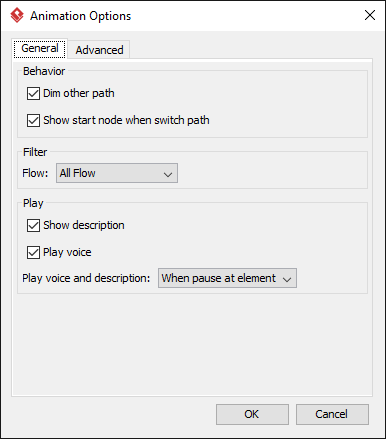
Animation Options – General

| Name | Description |
|---|---|
| Dim other path | It dims the components that are not a part of the selected path. |
| Show start node when switch path | Jump to the first node of the selected path, or keep staying at the current viewing field. |
| Flow | All Flow: Re-evaluate added animations to accept all available paths. Sequence Flow: Re-evaluate added animations to accept only paths that are joined by sequence flows. Message Flow: Re-evaluate added animations to accept only paths that are joined by message flows. |
| Show description | It shows description of shape when playing the animation in exported HTML. |
| Play voice | Voice can be recorded as description of model element. Check this if you want to play recorded voice when playing the animation in exported HTML. |
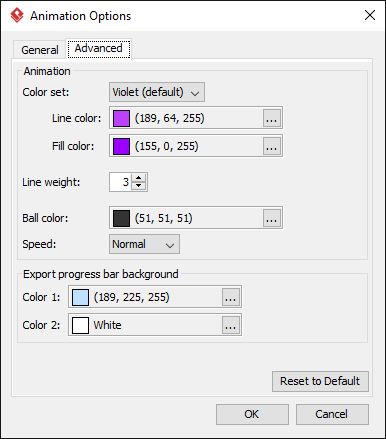
Animation Options – Advanced

| Name | Description |
|---|---|
| Color set | Select a color set to controls the line and fill color of visited shape. |
| Line color | The line color of visited shapes. |
| Fill color | The fill color of visited shapes. |
| Line weight | The thickness of rectangle that surround the visited shapes’. |
| Ball color | The color of ball that goes through a path during animation for indicating the progress of flow. |
| Speed | The pace of animation. |
| Export progress bar background – Color 1 | The background color for the top of progress bar in exported HTML. |
| Export progress bar background – Color 2 | The background color for the bottom of progress bar in exported HTML. |
Exporting animation
You can export the animation to Web contents so that you can play it externally in another computer just by playing in a Web browser. To export animation, click on Export on the right of the Animation Panel. Then, fill in the file path and click OK in the Export Animation. You can add paths to be exported by clicking the plus button.
