In order to simulate a business process, you need to define simulation details like available and required resources, duration of tasks/sub-processes, instances of pools/lanes and scenarios. All these information can be defined in Simulation Control Pane which is a pane that display at the bottom of diagram, important for adjusting any settings related to simulation. The panel will be updated base on your selection in active diagram. Besides setting simulation details, start/pause of simulation can also be done in the panel.
Opening Simulation Control Panel
To open the Simulation Control Panel, right click on the business process diagram that you want to simulate and select Show Simulation Control Panel from the popup menu.
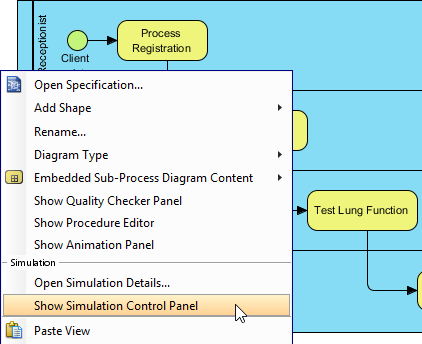
Note: You can open Simulation Control Panel only for diagram that has selected Simulation as diagram type. To check/edit diagram type, right click on the background of business process diagram and select Diagram Type from the popup menu.
Overview of Simulation Control Panel
Common
| No. | Name | Description |
|---|---|---|
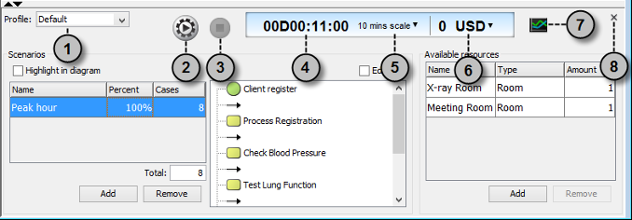
| 1 | Profile | To create a new profile for simulation, select Configure Profile… from the drop-down menu and name the newly created profile in the Configure Profile dialog box. |
| 2 | Start / Pause | Click to start simulation when paused or stopped base on the resource, duration and scenario settings or to pause a simulation when it is playing. |
| 3 | Stop | Stop a simulating business process. |
| 4 | Clock | Displays the time elapsed from the beginning of simulation until the current moment. It is for reflecting the duration of the execution of business process, and is based on the selection of time scale. |
| 5 | Time scale | Control the speed of simulation. For example, a selection of 10 mins scale simulates the business process in speed 10 min per second. |
| 6 | Current unit | Click to select the current unit, such as US Dollar, Hong Kong Dollar and Yen, for the consumption during simulating. |
| 7 | Simulation charts | Click to display a new window that display the completion, resource usage and queue time charts base on the settings of resource, duration and scenario. You can treat it as a chart form of simulation outcome. |
| 8 | Close | Click to close the Simulation Control Panel. You can open it again by right clicking on the business process diagram and selecting Show Simulation Control Panel from the popup menu. |
When selected pool/lane

| No. | Name | Description |
|---|---|---|
| 1 | Instance | When you model a business operation in business process diagram, you use pools and lanes to represent participants and sub-participants of the process, such as Client and Receptionist. No matter how many actual participants are there, you will still use a single pool (or lane) to represent all of them. For example, you will draw a pool Receptionist to represent all receptionists instead of drawing 5 pools for representing the fact that there are 5 receptionists.
Here the Instance field which allow you to set the number of instances of the selected pools or lanes. If there are 5 receptionists, enter 5 for instance of pool/lane Receptionist. Provided that there are sufficient resources for performing jobs, the number of instances affects the performance of process – The more the instances, the more the efficient. During process improvement, you can adjust the instance to evaluate the impact of increasing or decreasing the number of staff to handle certain job. |
| 2 | Show Scenarios | Scenarios are the expected way of executing a business process during simulation. Click Show Scenarios to list the scenarios, and add/remove scenarios in further. |
| 3 | Available resources | The table of available resources list the resources needed by the business process. For example, a process of body checking has resources X-Ray room and reception counter. Each resource has a name, a type and its amount. |
| 4 | Add available resource | Click to add an available resource by giving its name, selecting/entering its type and setting its amount. |
| 5 | Remove available resource | Select an available resource and click this button to remove it. |
When selected flow objects
| No. | Name | Description |
|---|---|---|
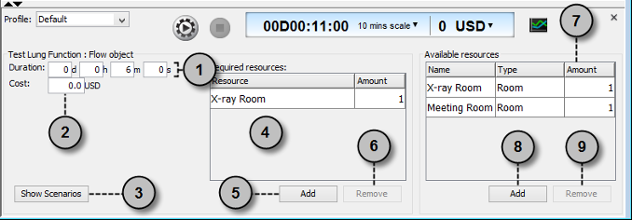
| 1 | Duration | The time the selected flow object need to take to process and complete a job. The 4 boxes d, h, m and s mean day, hour, minute and second, respectively. For example, if it takes five minutes to present a document to client in a body check operation, then set the business task Present Document‘s duration to be 5 m, meaning 5 minutes.
The duration setting affects the performance of process – The less time is needed, the more efficient it is. However, do not forget that the less time it takes to complete a task may affects the quality of work. During process improvement, you need to keep the balance between efficiency and quality of work and adjust the duration accordingly. |
| 2 | Cost | The cost the selected flow object need to spend to process and complete a job. |
| 3 | Show scenarios | Scenarios are the expected way of executing a business process during simulation. Click Show Scenarios to list the scenarios, and add/remove scenarios in further. |
| 4 | Required resources | The resources the participant needed in order to complete a job when processing the selected flow object. The Resource column shows the names of resources. The Amount column shows the number of resource needed to use in completing the task per participant. For example, to present document to client, you need one resource Meeting Room, and one resource Projector. |
| 5 | Add required resource | Click to add the resource the participant needed in order to complete a job when processing the selected flow object. Make sure you have available resources defined in order to select a required resource. Also note that you cannot set an amount that exceed the amount set in available resource. For example, if you have 6 available projectors (resources), the maximum number of projector a flow object can require is from 0 to 6. |
| 6 | Remove required resource | Select a required resource and click this button to remove it. |
| 7 | Available resources | The table of available resources lists out the resources needed by the business process. For example, a process of body checking has resources X-Ray room and reception counter. Each resource has a name, a type and its amount. |
| 8 | Add available resource | Click to add an available resource by giving its name, selecting/entering its type and setting its amount. |
| 9 | Remove available resource | Select an available resource and click this button to remove it. |
When selected diagram background / showing scenarios
| No. | Name | Description |
|---|---|---|
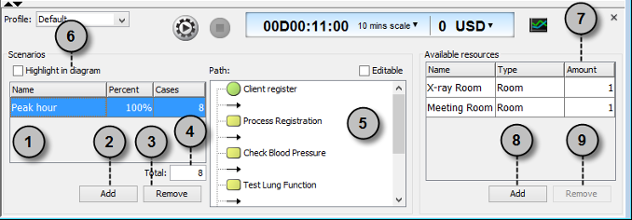
| 1 | Scenarios | Scenarios are the definitions of how to execute a business process during simulation. A scenario consists of a selection of possible execution path formed by flow objects in diagram with the number of instances, which represents the number of time the path will be executed at a specific instant.
For example, if you want to simulate the case in which 10 clients need to perform body checking in a business process of body checking, to see whether the process can handle this situation well, you will add an scenario Performing body check, with 10 as number of instances. |
| 2 | Add scenarios | Click this button to add an scenario with name and number of instances. |
| 3 | Remove scenario | Select a scenario and click this button to remove it. |
| 4 | Total cases | The total number of cases of all scenarios. |
| 5 | Path | The flow objects involved in a scenario. If there is a gateway in your diagram, you need to make a decision to the outgoing path of the gateway object. |
| 6 | Highlight in diagram | Check this button to make the diagram highlight the path involved in the scenario selected in Scenarios table. |
| 7 | Available resources | The table of available resources list the resources needed by the business process. For example, a process of body checking has resources X-Ray room and reception counter. Each resource has a name, a type and its amount. |
| 8 | Add available resource | Click to add an available resource by giving its name, selecting/entering its type and setting its amount. |
| 9 | Remove available resource | Select an available resource and click this button to remove it. |
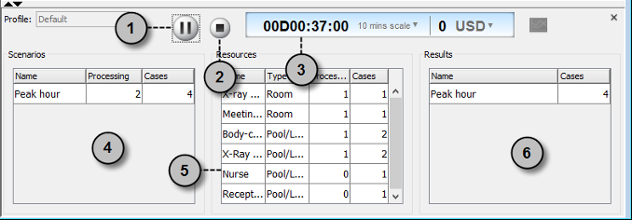
When simulating
| No. | Name | Description |
|---|---|---|
| 1 | Pause | To temporarily pause a simulation. |
| 2 | Stop | To stop simulating the business process. |
| 3 | Clock | Display the time elapsed from the beginning of simulation until the current moment. It is for reflecting the duration of the execution of business process and it is based on the selection of time scale. |
| 4 | Scenarios | A list of scenarios with their completeness throughout the simulation. The Processing column shows the jobs under processing by the simulating process. The Instances column shows the amount of non-completed jobs. It should keep decreasing and will become 0 at the end of simulation. |
| 5 | Resources | A list of resources with the status of consumption throughout the simulation. The Processing column shows the amount of resources be consumed by the simulating process. The Instances column shows the total amount of resources. You can observe this table to study the current resource allocation. |
| 6 | Results | A list of completed scenarios. The Instances column shows the amount of completed scenarios. |