The UML tool of Visual Paradigm supports animating activity diagrams. The animation lets you see clearly the flow of actions in a control flow.
- Select Modeling > Animation from the toolbar.
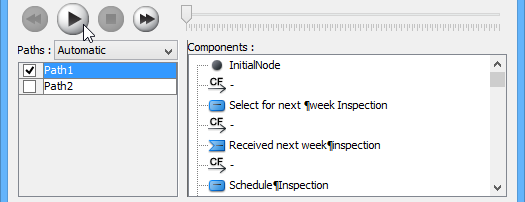
- In Activity Diagram Animation window, select a path and then click Play.
Note: Animation can also be started by using any of the ways below:- Right-click on the diagram background and select Utilities > Animation… from the popup menu.
- Click the drop-down menu of Modeling Tools and select Animation… on the toolbar.
Overview of Animation
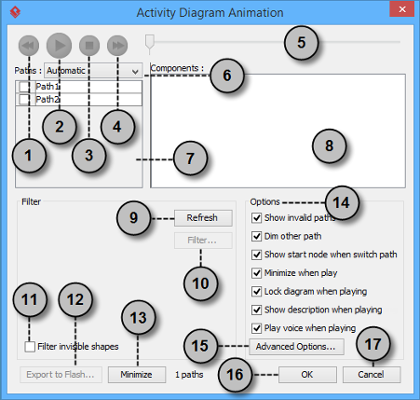
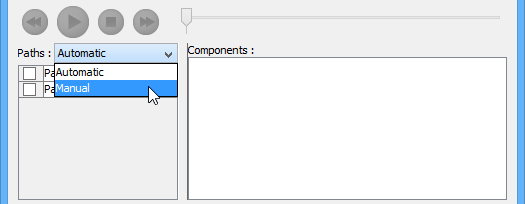
The Activity Diagram Animation window will pop out after clicking Animation…. This window is where you can select an execution path to play an animation.
| No. | Name | Description |
|---|---|---|
| 1 | Backward | Move one shape backward in the flow. |
| 2 | Play | Play or continue to play the animation with Animation minimized. |
| 3 | Stop | Terminate the animation. |
| 4 | Forward | Advance to the next shape in the flow. |
| 5 | Slider | It is used for controlling the flow of animation. |
| 6 | Paths | It provides two ways of producing animation for the possible paths. Automatic: It is chosen by default. This helps you to detect all possible paths automatically. Manual: Choose when you want to select the possible path(s) manually. |
| 7 | Paths list | It lists all possible ways of executing an Activity. By default, paths are named as Path1, Path2, and so forth. You can rename them by double clicking on them and giving meaningful names. |
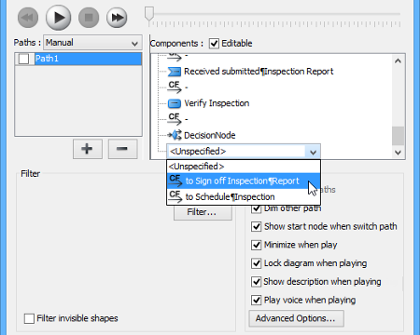
| 8 | Components list | It displays all components of the selected path. Pressing on a component will highlight the first shape of the chosen path until the chosen shape in the diagram. |
| 9 | Refresh | It is used for re-identifying the paths base on filter assignment and diagram content. |
| 10 | Filter… | It helps removing the non-selected paths by specifying the end result of fork nodes. |
| 11 | Filter invisible shapes | A shape can be set invisible on a diagram, or become invisible due to belonging to an invisible layer. By checking this option, invisible shapes will be ignored when calculating paths. By unchecking, invisible path will be included when calculating paths. By unchecking, you will see a black ball fly on diagram without attaching to the invisible shape(s) when executing a path. |
| 12 | Export to Flash… | Select an output path for exporting this diagram’s animation to Adobe Flash. |
| 13 | Minimize | Click to minimize this window. |
| 14 | Options pane | The Options pane helps you to configure animation. Show invalid paths: It lists not only the valid and selected path, but also the invalid and non-playable paths in the Paths list. Dim other path: It dims the components that are not a part of the selected path. Show start node when switch path: Jump to the first node of the selected path or keep staying at the current viewing field. Minimize when play: It minimizes this window when playing an animation. Lock diagram when playing: It locks the diagram when playing the animation to prevent accidental editing. Show description when playing: It shows description of shape at the bottom right of diagram when playing the animation. Play voice when playing: Voice can be recorded as descriprion of model element. Check this if you want to play recorded voice when running animation. |
| 15 | Advanced Options… | It provides the color and speed options for animation. |
| 16 | OK | Click this button to confirm the settings and close Animation. |
| 17 | Cancel | Click this button to close Animation without saving the editing. |
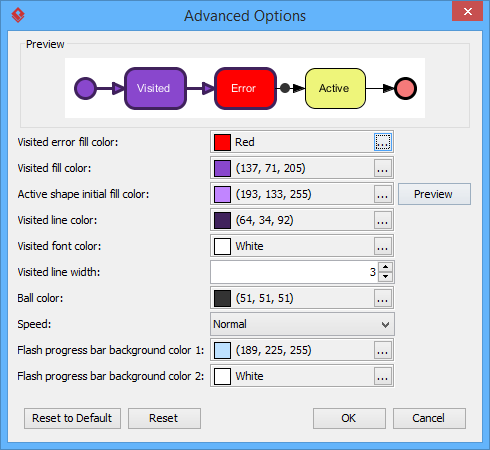
Advanced Options
| Name | Description |
|---|---|
| Visited error fill color | The background color of visited shape that cause an error. An error means the flow object that causes a path invalid. |
| Visited fill color | The background color of visited shapes. |
| Active shape initial fill color | When playing an animation, a tiny black ball will traverse the chosen path, from one shape to another. When it reaches a shape, the shape will render with a transition effect that means transiting from an initial color to visited fill color. This option manages the initial background color for visiting shape. |
| Visited line color | The line color of visited shapes. |
| Visited font color | The font color of visited shapes. |
| Visited line width | The thickness of visited shape’s border. |
| Ball color | The color of ball that goes through a path during animation for indicating the progress of flow. |
| Speed | The pace of animation. |
| Flash progress bar background color 1 | The background color for the top of progress bar in exported Flash movie. |
| Flash progress bar background color 2 | The background color for the bottom of progress bar in exported Flash movie. |
Naming a Path
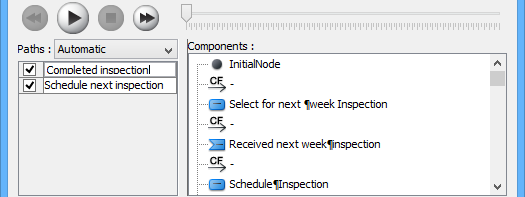
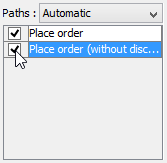
The Paths list displays all possible animation paths of your diagram. Each path represents a possible way to go through the diagram. By default, paths are named as Path1, Path2, and so forth. It is recommended to name to the path(s) for better clarification.
- To rename a path, move the mouse pointer on a path in the list and double click on it.
- Enter the name of path.
- Press Enter to confirm editing.
Creating a Manual Path
In Activity Diagram Animation window, all paths are listed in Paths list by default. However, you can manage the flow of animation with your own choice. To create a manual path:
- Select Manual in Paths.
- Press Add Path to insert a new path.
- Select the shapes that are shown on the Components list to direct the flow of animation.
- Click OK to confirm editing.
Handling Decision
You should choose an outgoing flow when there is more than one option in the flow. Different decisions will lead to different forks and make a different outcome for the flow of animation. Make either decision to view the outcome.
Reviewing an Animation
- When everything is ready, click Play to start the animation of the selected path.
- After click Play, Activity Diagram Animation window will be minimized to the bottom of your diagram with several buttons and a slider revealing on it.
Button Name Description 
Backward Move one shape backward in the flow. 
Pause Temporary stop playing the movie. Press Play to continue to play. 
Play Play or continue to play the animation. 
Forward Advance to the next shape in the flow. 
Stop Terminate the animation. 
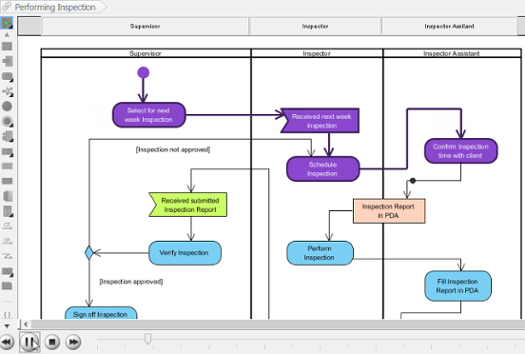
Maximize Maximize Animation. - When the animation starts, a black ball will appear at beginning of path and traverse through the path until the end.
- When the black ball reaches a shape, the shape will turn into purple.
Exporting an Animation
You can export the animation to Web contents so that you can play it externally in another computer just by playing in a Web browser.
- From the Paths list in the Animation window, select the execution paths to export as Flash movie.
- Click the Export to Flash… button at bottom left. This shows the Export to Flash window. Here is a description of the Export to Flash window.
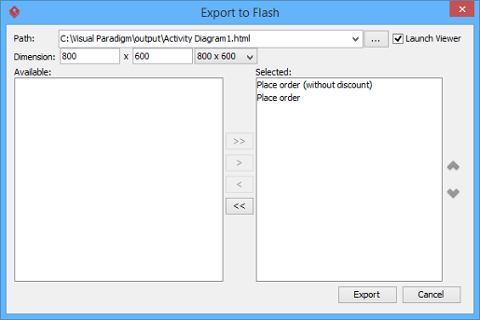
Here is a description of the Export to Flash window.Part Description Path The path of the exported HTML file. Flash movie file (.swf) will also be exported to the same folder as the HTML file. Launch Viewer When checked, default web browser will automatically start and play the exported Flash movie. Dimension The width and height of viewing region of Flash. Available Available paths that can be selected to export to Flash movie for animation. Selected Selected paths to export to Flash movie for animation. - An HTML web page will be exported. Specify the path of the HTML file. Note that the Flash movie files (.swf) will be exported to the same folder as the HTML file.
- Choose or enter the dimension of movie if necessary. Note that the dimension determins the size of viewable region instead of the size of diagram.
- Click Export. Open the HTML file in the web browser to play the movie. If there are more then one path being selected, you can click on the drop down menu at top right corner and select another path to play with.