You can change the diagram element’s style in the Formats window. To open the Formats window, right click on the shape and select Styles and Formatting > Formats… from the pop-up menu.
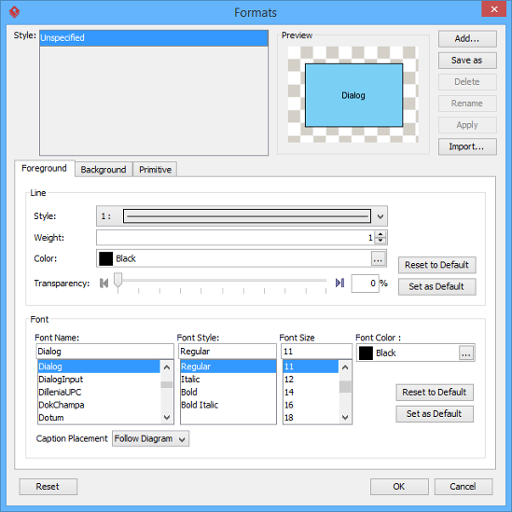
You can change the following settings from the Formats window
- Changing shapes foreground style
- Changing shapes font style
- Changing shapes background style
Changing shapes foreground setting
In the Format window, you can change the foreground style in the Font section. Just click on the … button beside the Color field to select a color either from the Default page (which shows predefined colors) or from the Custom page (which shows a larger variety of colors, and allows you to define any custom colors). If you want to specify a custom color, you can switch to the Custom pane.
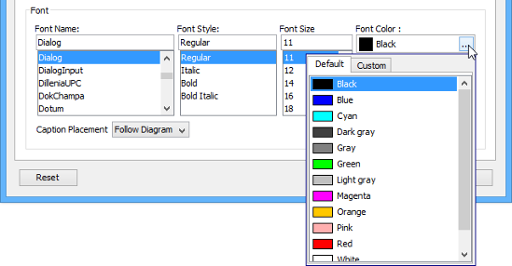
After change the font color, the preview will update automatically.
Changing shapes font
In the Font section, you can also change the font name, style and size.
| Field | Description |
|---|---|
| Font Name | Select different types of font. The number of fonts depends on the fonts available in your computer. |
| Font Style | Select different types of font. The number of fonts depends on the fonts available in your computer. |
| Font Size | Select the size of font. You may either click on the default sizes or enter the font size in the text fields. |
Changing shapes background
You can click on the Background tab to custom the background style.
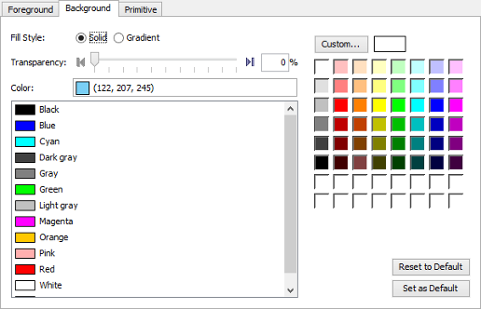
In the Background tab, it allows you to select a solid fill color or a gradient fill color as well as define its transparency.
| Field | Description |
|---|---|
| Fill Style | Select the fill style of the fill color. It can either be Solid (a single color) or Gradient (a fill color that is mixed by two colors). |
| Transparency | Specify the transparency of the fill color. The greater the value, the more transparent is the shape. 0 (zero) transparency makes the fill color completely opaque, while 100 (one hundred) transparency makes the fill color completely transparent. You can adjust the transparency by dragging the slider or by typing the value in the text field. Alternatively, you can click the Opaque button |
| Preview | The Preview pane displays a rectangle that is filled with the editing fill color. The background is checked so that you can also preview the transparency of the fill color as well. |
| Save as Default | Save the current fill color as the default fill color for new shapes, click the Set as Default button. |
| Reset to Default | Reset the current fill color to the default fill color, click the Reset to Default button. |
Upon selecting Gradient from the Fill style field, you will see the detail pane for formatting a gradient fill color.

| Field | Description |
|---|---|
| Color 1 | You can select the first color of the gradient from the Color 1 field. To select a color click the … button or double-click on the color editor. A color chooser will appear for you a select a color. |
| Color 2 | You can select the second color of the gradient from the Color 2 field. To select a color click the … button or double-click on the color editor. A color chooser will appear for you to select a color. |
| Gradient Color Themes | The Gradient Color Themes pane displays a list of pre-defined gradient color themes. To add a new color theme select Color 1 and Color 2 then click the Add to Themes… button. Please note that you must select a combination of colors that does not already exist in the color themes. To rename a theme click on the Rename… button or double-click on the desired theme. An input dialog will appear for you to enter a new name. To remove a theme select the theme and click on the Remove button, or use the Delete key instead. |
| Gradient Style | The Gradient Style pane allows you to select the gradient style of the gradient fill color (the angle of how the gradient color is drawn). There are sixteen pre-defined gradient styles, which are shown as toggle button in the Gradient Style pane. To select a gradient style to use click on one of the styles. |
Click OK button to confirm editing. As a result, the shape is changed into formatted style.
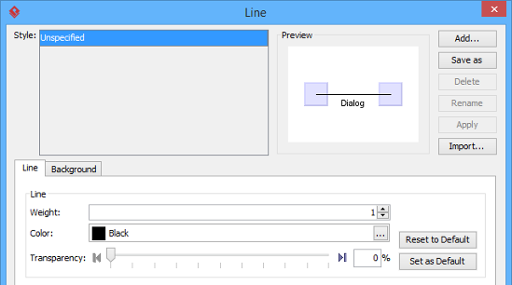
Changing line format
To change a connector line’s style, open the Formats window first. Right click on the connector and select Styles and Formatting > Formats… from the pop-up menu. Then, you can format the line style in the Line tab. It allows you to adjust weight (thickness), color and transparency.
| Field | Description |
|---|---|
| Weight | Adjust the weight (thickness) of a line. The greater the value, the thicker the line. You can use the up/down button to increase/decrease the line weight, or you can type directly into the text field. The line weight ranges from 1 to 20. |
| Color | Specify the line color. Click on the … button beside the Color field to select a color, either from the Default page (which shows predefined colors) or from the Custom page (which shows a larger variety of colors, and allows you to define any custom colors).
Note: Only integer values can be used for line weight. If you type 2.8 in the text field, 2 will be applied instead. |
| Transparency | Specify the transparency of the line. The greater the value, the more transparent the line. 0 (zero) transparency makes the line completely opaque, while 100 transparency makes the line completely transparent. You can adjust the transparency either by dragging the slider, or by typing the value in the text field. Alternatively you can click on the Opaque button |
| Preview | The Preview pane displays a rectangle surrounded by the line with the selected line format applied. |
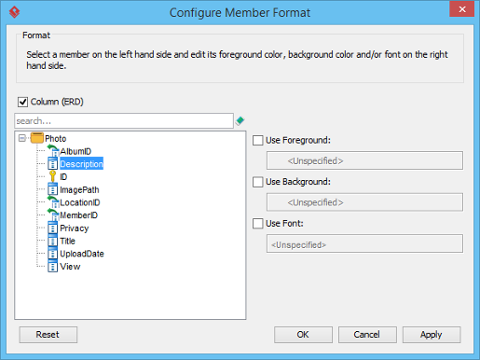
Changing class/entity members’ format
You can also configure the formatting of class and entity members like attributes, operations and entity columns. To configure the formatting of member:
- Right click on that member in the parent shape.
- Select Formatting > Configure Format… from the popup menu.
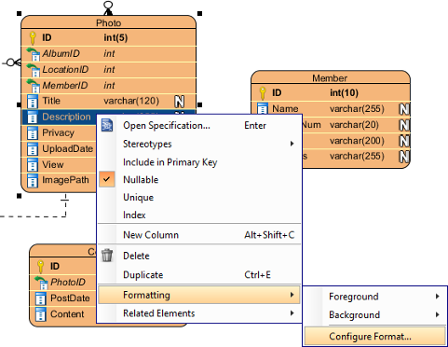
- In the Configure Member Format window, select the property or properties that you want to edit – foreground, background and/or font, and then make the changes you want. If you want to apply changes to multiple members, you can perform a multiple selection in the list on the left hand side. Press Shift/Ctrl for a multiple selection.
Present shape as primitive shape
In addition to the standard appearance of notations (e.g. stickman for actor, box for class, oval for use case, etc), here you have one more option – the primitive option. The primitive option enables you to present any kind of shape as simple rectangle/oval/rounded rectangle shape. You can specify custom text to such “primitive shape”, which is particular useful for modeling for general-purposes. A sample use would be to present an actor that represents a computer as a rectangle, and then describe its role with custom text and have it presented on diagram.
To show a shape as primitive shape:
- Right click on the shape and select Presentation Options > Primitive Shape… from the popup menu.
- Adjust the appearance of shape by setting Shape type.
- Adjust the content of shape by setting Text. The Name option makes the name of shape presented. The Tagged value option enables you to display the value of a specific tag. You need to enter the tag name in the drop down menu, or select from the list of existing tags. The Customoption enables you to display whatever text you want.
- Click OK when ready.