You can export diagrams in your project to image files. You can specify not only the quality and format (e.g. JPG, PNG, SVG, EMF, PDF) of images but also to slice diagram into pieces for easier insertion into documents.
Export diagrams
- Select Project > Export > Diagrams as Image… from toolbar.
- In the Export Diagrams as Image window, select the diagram(s) to export.
- Specify the output destination for storing the image files.
- Click Export button to export the diagrams.
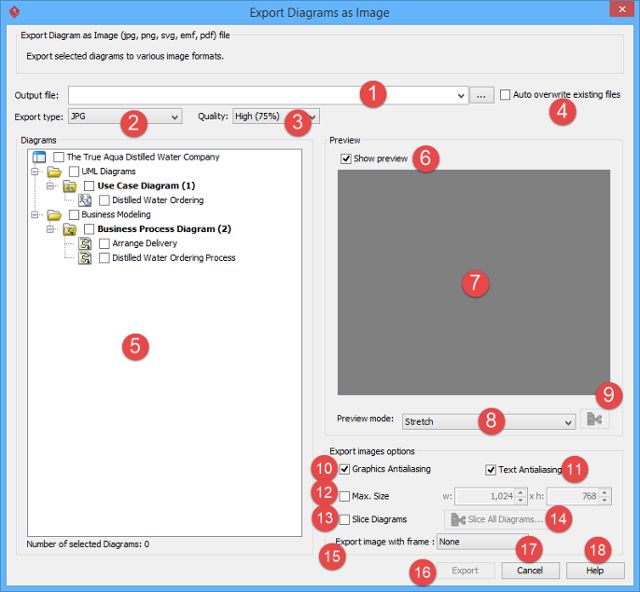
An overview of Export Diagrams as Image
| No. | Name | Description |
|---|---|---|
| 1 | Output destination | The Output destination is the directory where all the exported images are saved to. You can enter the path in the text field directly or you can click on the … button to browse for the directory. |
| 2 | Export type | To select the image format of the exported image, click on the pull-down box beside the Export type field and select the format you want to use. There are two options for exporting as PNG files – with and without background. With background will export diagram’s background color. Without diagram will ignore the background color by exporting transparent background. You can export Visual Paradigm diagram to native PDF format. Since the exported PDF is of a small size, it can save a lot of space. Also, because the diagram in PDF is a vector, it is scalable. There are two different options when you export. For PDF (diagram per page), all the diagrams selected will be exported in the same PDF file. Each diagram will occupy one page. For PDF (diagram per file), each diagram selected will be exported in one new PDF file. |
| 3 | Quality | The quality of image. By applying a higher quality, the images will be clearer but larger in file size. By applying a lower quality, the images will look more blur but smaller in file size. |
| 4 | Auto overwrite existing files | You can check the Auto overwrite existing files checkbox to allow overwriting of files in the export process. |
| 5 | Diagrams | The Diagrams pane shows the diagrams in the current project. Check the checkbox beside the diagram you want to export. The number of selected diagrams is displayed at the bottom of the Diagram pane. The Preview pane also allows you to preview the exported image of the selected diagram. |
| 6 | Show preview | Check or uncheck to enable or disable the preview. |
| 7 | Preview | The Preview pane shows the preview of the exported image of the selected diagram in the Diagrams pane. |
| 8 | Preview mode | Select the size of the preview image by selecting from the pull-down box beside the Preview mode field. Selecting Stretch will show the image in scaled size that fits to the preview area, while selecting Real size will show the image in its actual size. |
| 9 | Diagram slicer | Click to configure how diagram is sliced into pieces. This is enabled only when the check box for Slice Diagrams (for slicing all diagrams) is unchecked. For details about slicing diagrams, please refer to the following section. |
| 10 | Graphics Anti-aliasing | Anti-aliasing is a method which handles the staircase pixels of slanted lines and curves to make them look smoother. You can apply anti-aliasing to the exported images. To apply anti-aliasing to graphics, check the Graphics Anti-aliasing checkbox. |
| 11 | Text Anti-aliasing | Anti-aliasing is a method which handles the staircase pixels of slanted lines and curves to make them look smoother. You can apply anti-aliasing to the exported images. To apply anti-aliasing to text, check the Text Anti-aliasing checkbox. |
| 12 | Max. Size | Maximum size of exported images. If the diagram size is larger than the maximum size, it will be resized. |
| 13 | Slice Diagrams | Enable it to slice all diagrams into pieces to obtain multiple image files for a single diagram. For details, please refer to the following section. |
| 14 | Slice all diagrams | Click to configure slice settings on all diagrams. |
| 15 | Export image with frame | A frame is a border that prints around a diagram. By selecting None, frame won’t be printed. By selecting Export with frame,a frame will be added to exported images, making the diagram name show at the top left of diagram. By selecting Export with border, a black and thin border will be added to exported images. |
| 16 | Export | Click to proceed with exporting. |
| 17 | Cancel | Click to close the exporter without exporting diagrams. |
| 18 | Help | Click to show the help contents. |
Slice a diagram into pieces with diagram slicer
You can slice diagrams into pieces (number of files) as well as restrict the size of the exported diagrams.
The slice diagram window
The way how diagram is sliced can be set per diagram or to all diagrams. To slice a diagram, click on the slice button right under the diagram preview in the Diagram Exporter window. To slice all diagrams, enable Slice Diagrams and click on Slice All Diagrams button. Both ways open the Diagram Slicer for configuring how diagram(s) is to be sliced.

Below is the description of different parts of the window.
| No. | Name | Description |
|---|---|---|
| 1 | No slicing | Do not slice diagram. |
| 2 | Fixed size | A simple strategy which slice exported diagram into pieces that have the same size. |
| 3 | Free slicing | User can customize how to slice the exported diagram by specifying the position of vertical slices and horizontal slices. |
| 4 | Fixed ratio | User can customize how to slice the exported diagram by specifying the position of vertical slices and horizontal slices. |
| 5 | Add row | Slice the diagram into specific number of rows. |
| 6 | Add column | Slice the diagram into specific number of columns. |
| 7 | Remove row | Reduce the number of rows to slice. |
| 8 | Remove column | Reduce the number of columns to slice. |
| 9 | Rows | The number of rows for slicing a diagram. |
| 10 | Columns | The number of columns for slicing a diagram. |
| 11 | Zoom in | Magnify the diagram content. |
| 12 | Zoom out | Magnify the diagram content. |
| 13 | Zoom fit to screen | Adjust the diagram to make it fit well on the slicer window. |
| 14 | Show label | Click to show/hide index label. |
| 15 | Scale | The way of scaling. When configuring slicing for all diagrams, this part will not be displayed. |
| 16 | Width | The total width of diagram. |
| 17 | Height | The total height of diagram. |
| 18 | Ruler | Shows the size of the diagram. When the slicing strategy Free Slicing is selected, a new row and column can be created by dragging a new one from the ruler. |
| 19 | Slice line | Lines that divide the diagram into pieces. The show the vertical and horizontal position that the diagram will be sliced at. When Free Slicing or Fixed Ratio is selected, the lines can be dragged and moved. |
| 20 | Index label | Shows the index of the pieces. This index will be printed on the exported file as well. |
| 21 | Diagram | The diagram being sliced. |
| 22 | Total pieces | The number of pieces to produced. |
| 23 | OK | Click to confirm the slice settings. |
| 24 | Cancel | Click to close the diagram slicer with changes discarded. |
Slicing strategies
There are three slicing strategies – Fixed Size, Free Slicing and Fixed Ratio. Each gives a distinct way of slicing images.
Fixed size
Fixed Size is a simple strategy which slice exported diagram into pieces that have the same size. User specifies the number of columns and rows to slice and then the exported diagram will be sliced into specific pieces.
Free slicing
User can customize how to slice the exported diagram by specifying the position of vertical slices and horizontal slices. It is particularly useful to prevent a shape from being sliced into pieces.

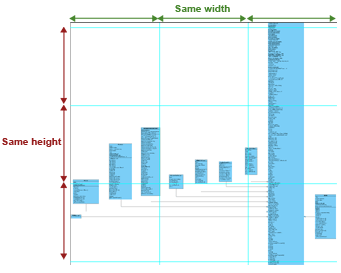
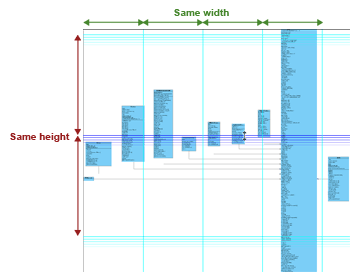
Fixed ratio
Fixed Ratio strategy gains the benefit of Fixed Slice and Free Slicing. The width and height of pieces are the same but last row and column. User can also customize the width and height of sliced pieces. Like Free Slicing, Fixed Ratio is size oriented. User modifies the size of pieces and Diagram Slicer calculates the number of row and column to slice.
Controlling size of exported image
Diagram Slicer not only slice diagram into pieces but also controls the total size of the exported diagrams. There are scale controls on the right of the toolbar from the Diagram Slicer dialog. By default, the type of scale is Original. And it shows the size of diagram. The following are some of the possible ways of controlling diagram size.
Control by size
To control the total size of the exported diagram by specific width and height, select Size from the Scale combo box and then enter the width and height of the diagram. The ruler shows the size of the diagram.
Control by ratio
To control the total size of the exported diagram by specific ratio, select Ratio from the Scale combo box and enter the ratio in the field next to the combo box. The total size of the exported diagram shows next to that field.